国内镜像仓库
大约 4 分钟server
概述
2025年国内大厂以及各个名校的镜像地址都关闭了,现在只能自己搭建了,在华东2(上海)
轩辕镜像
在安装 docker 后执行命令 docker login docker.xuanyuan.run 登录,依次输入账号和密码,自己的账号是手机号,密码是最复杂的安全密码。登录成功后就可以拉取镜像了
docker pull docker.xuanyuan.run/镜像名:标签
docker pull docker.xuanyuan.run/redis:latest
国内镜像源
# 创建镜像配置文件
vim /etc/docker/daemon.json
# 复制下面内容
{
"debug":true,
"experimental":true,
"registry-mirrors":["https://pb5bklzr.mirror.aliyuncs.com","https://hub-mirror.c.163.com","https://docker.mirrors.ustc.edu.cn"]
}
# 修改为国内镜像源后重启docker
systemctl restart docker
代理网络
让 docker 拉取镜像时使用代理网络的方法
# 创建配置文件夹
sudo mkdir -p /etc/systemd/system/docker.service.d
# 创建配置文件
sudo vim /etc/systemd/system/docker.service.d/http-proxy.conf
# 填写如下内容后保存
[Service]
Environment="HTTP_PROXY=http://192.168.0.68:7890/"
Environment="HTTPS_PROXY=http://192.168.0.68:7890/"
Environment="NO_PROXY=localhost,127.0.0.1,.example.com"
# 刷新并重启docker
sudo systemctl daemon-reload
sudo systemctl restart docker
# 开始使用魔法
2026年3月21日 在 ubuntu22server 中安装 jami 的 bootstrap 服务端时通过代理网络不行,轩辕站点找不到,最后通过 Grok 介绍,可以使用国内的代理/镜像站点解决,原本安装的脚本如下
sudo docker run -d \
  --name jami-bootstrap \
  -p 4222:4222/udp \
  --restart unless-stopped \
  ghcr.io/savoirfairelinux/opendht/opendht-alpine \
  dhtnode -p 4222 -s
将其中的 ghcr.io 替换为南京大学的地址 ghcr.nju.edu.cn 即可,替换后的命令如下
sudo docker run -d \
  --name jami-bootstrap \
  -p 4222:4222/udp \
  --restart unless-stopped \
  ghcr.nju.edu.cn/savoirfairelinux/opendht/opendht-alpine \
  dhtnode -p 4222 -s
xget
过人制作了一个提供魔法的仓库 Xget ,可通过多种方式释放魔法,要看全面的魔法到官方仓库,这里只介绍一个 github
# 原始 URL
https://github.com/microsoft/vscode/archive/refs/heads/main.zip

# 转换后(添加 gh 前缀)
https://xget.xi-xu.me/gh/microsoft/vscode/archive/refs/heads/main.zip
docker-compose
使用 docker-compose 创建容器时也会被墙,使用 xget 魔法的话需要配置全局魔法
# 安装工具 composer
sudo apt install composer -y

# 全局配置 Composer 镜像,使用本方法
composer config -g repo.packagist composer https://xget.xi-xu.me/packagist/

# 项目级配置,没有使用本方法
composer config repo.packagist composer https://xget.xi-xu.me/packagist/

# 验证配置
# 安装后通过命令 whereis composer 查看安装的路径,在 /usr/bin
# 移动到该路径后运行下面命令会提示没有配置文件
cd /usr/bin
sudo composer config -l

# 通过下面命令创建配置文件并填写魔法
sudo vim composer.json
# 填写下面内容
{
  "repositories": [
    {
      "type": "composer",
      "url": "https://xget.xi-xu.me/packagist/"
    }
  ],
  "require": {
    "symfony/console": "^6.0",
    "guzzlehttp/guzzle": "^7.0"
  }
}

# =========== 应用魔法 ===============
# 备份原始源列表
sudo cp /etc/apt/sources.list /etc/apt/sources.list.backup

# 配置 Debian 镜像
echo "deb https://xget.xi-xu.me/debian/debian bookworm main" | sudo tee /etc/apt/sources.list
echo "deb https://xget.xi-xu.me/debian/debian-security bookworm-security main" | sudo tee -a /etc/apt/sources.list

# 配置 Ubuntu 镜像
echo "deb https://xget.xi-xu.me/ubuntu/ubuntu jammy main restricted universe multiverse" | sudo tee /etc/apt/sources.list
echo "deb https://xget.xi-xu.me/ubuntu/ubuntu jammy-updates main restricted universe multiverse" | sudo tee -a /etc/apt/sources.list

# 更新包列表
sudo apt update
github&aliyun
先在 阿里云镜像 中创建自己的镜像仓库,选择 个人版实例 ,注意类似云服务器,这个也是有地区区分的,要选择 华东2(上海),创建登录密码,创建镜像仓库。创建后主要为获取下面4个环境变量的数据用于 github 中:命名空间、访问用户、密码、仓库地址
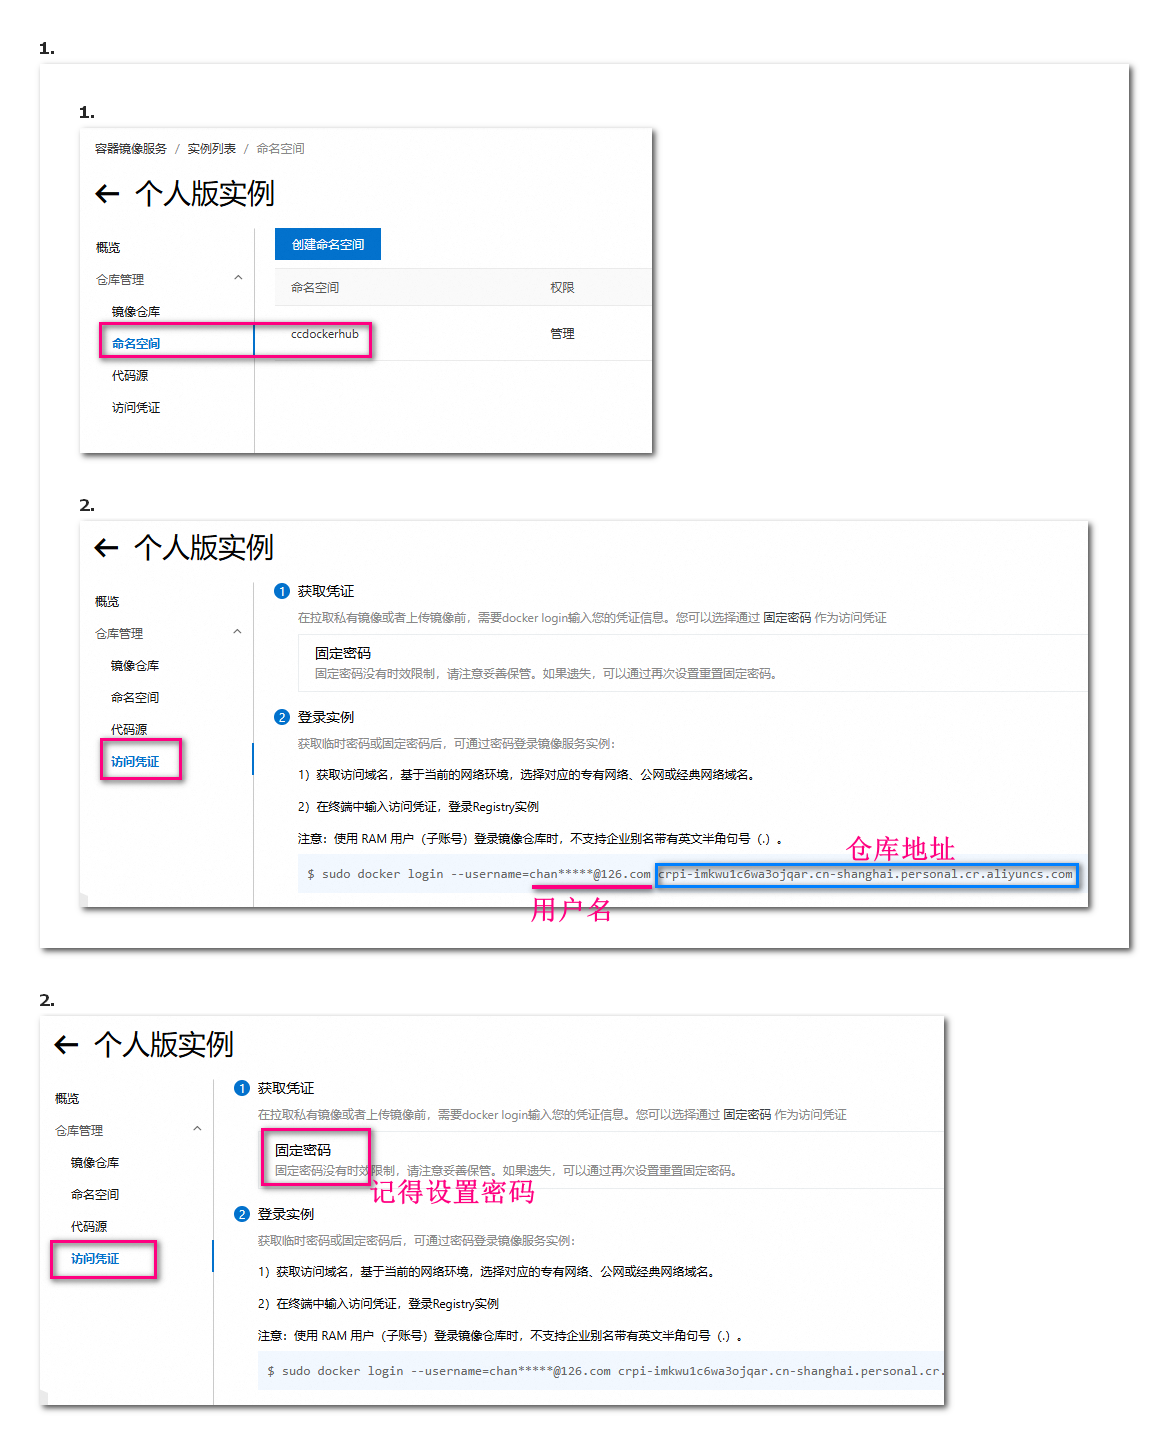
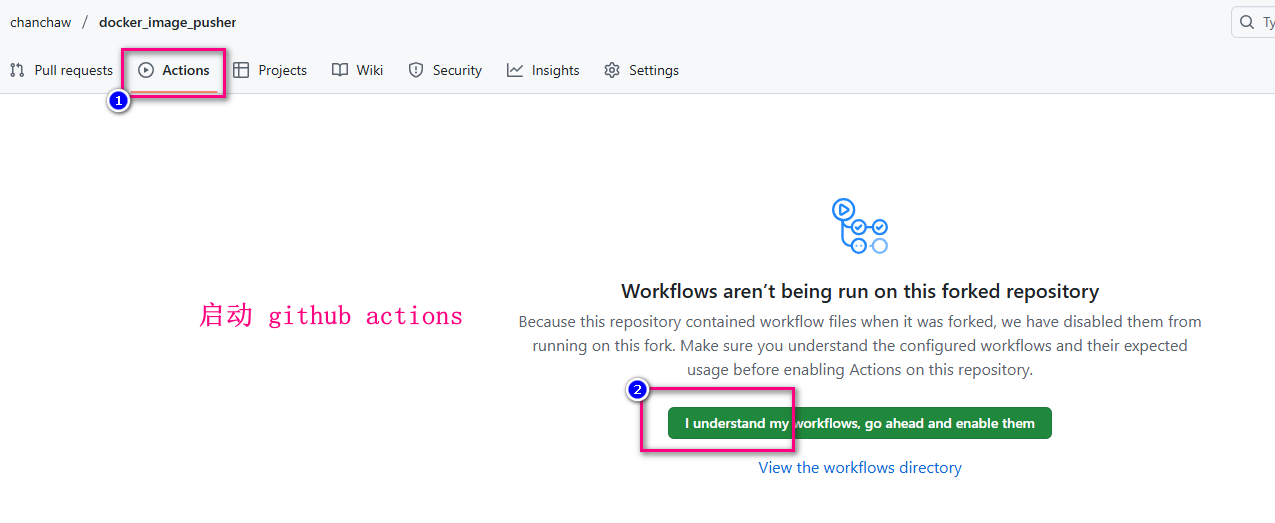
接下来进入 github仓库 然后 fork 为自己的仓库,通过上面工具栏按钮进入 setting

然后启动 github 的 actions
接下来是执行同步操作

最后是拉取阿里云中自己创建的镜像服务中的镜像文件
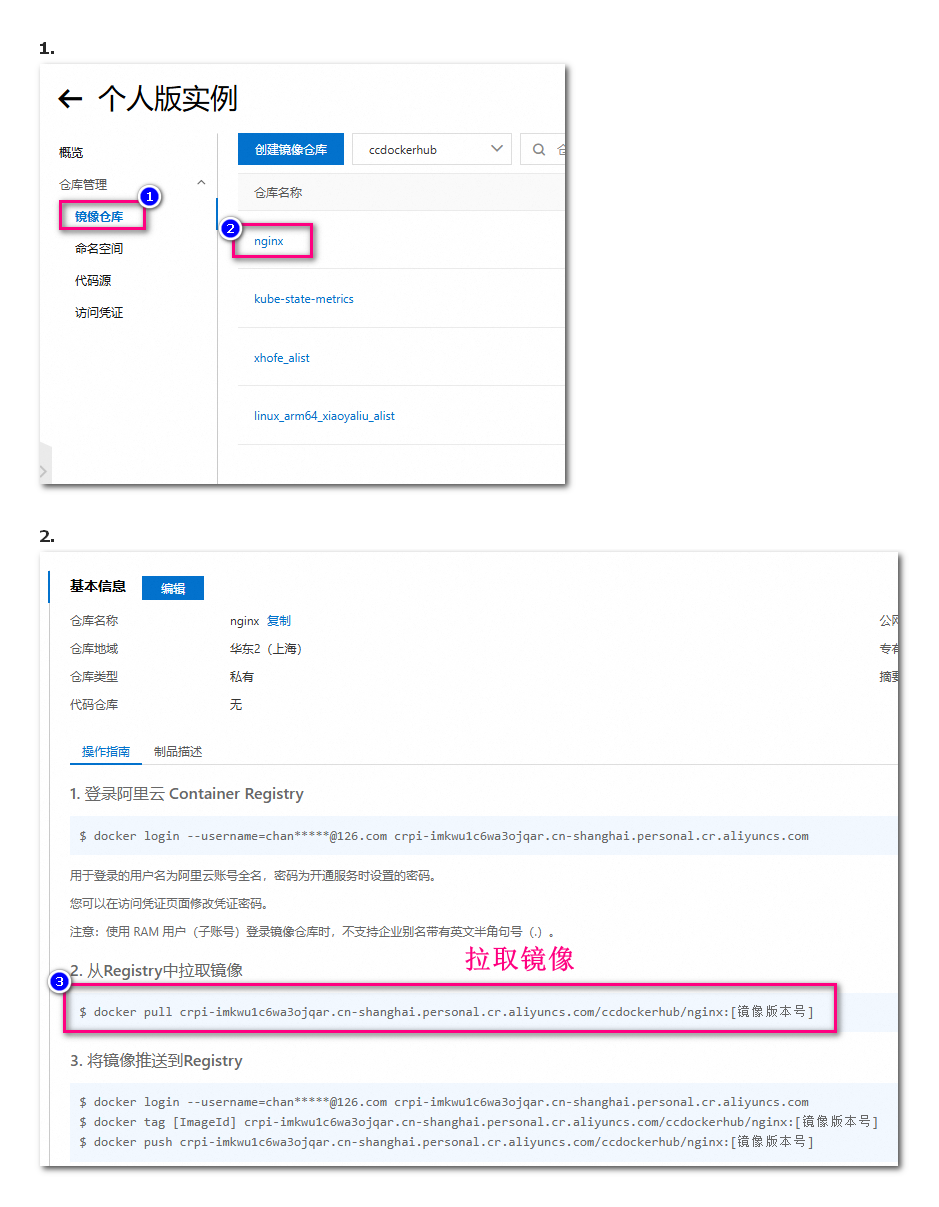
总结后使用 阿里云ACR 中的 docker 镜像的步骤如下
# 首先在 ubuntu22server 中登录
sudo docker login --username=自己的支付宝登录账号邮箱地址 crpi-imkwu1c6wa3ojqar.cn-shanghai.personal.cr.aliyuncs.com
# 拉取镜像,在仓库中找到目标镜像,拷贝上图中的步骤3并执行
# 创建容器,拷贝上图右上角的“公网地址”是:crpi-imkwu1c6wa3ojqar.cn-shanghai.personal.cr.aliyuncs.com/ccdockerhub/zipkin-slim
# 修改后完整的创建容器的命令是:(11149是宿主机的端口号,9411是容器内app使用的端口号)
# sudo docker run -d -p 11149:9411 crpi-imkwu1c6wa3ojqar.cn-shanghai.personal.cr.aliyuncs.com/ccdockerhub/zipkin-slim
错误与提示
DNS解析出错
# 通过下面命令登录阿里云个人镜像docker站点时出现如下提示
Error response from daemon: Get "https://crpi-imkwu1c6wa3ojqar.cn-shanghai.personal.cr.aliyuncs.com/v2/": dial tcp: lookup crpi-imkwu1c6wa3ojqar.cn-shanghai.personal.cr.aliyuncs.com on 127.0.0.53:53: read udp 127.0.0.1:32773->127.0.0.53:53: i/o timeout
# 表示本地DNS 127.0.0.53:53 无法解析连接到阿里云,要通过下面方法修改本地DNS解析
sudo vim /etc/resolv.conf
# 修改 nameserver 如下
nameserver 114.114.114.114
# 保存后重新登录