Serial Port
概述
本文介绍 java 串口通信功能的制作。必要的驱动文件在 180 的阿里云盘 -> 安装程序与软件 -> 开发与实施 -> web 开发 -> mfz-rxtx-2.2-20081207-win-x86x64.zip
案例
实际项目 https://gitee.com/chanchaw/callcenter.git 参考的项目 https://github.com/alidili/SerialPortDemo
中文编码与字节数组
向手表发送信息要向串口的 outputStream 中写入字节数组,而该字节数组应该是指定编码(中文一般用GB2312)的字节数组。如下面代码行号3,表示字符串变量 s 指定编码后获得字节数组。 而方法 bytes2HexString 将字节数组转换为16进制字符串的目的是将该16进制字符串拼接到带有开始和结束标志的请求命令中(该命令是16进制表示的字符串)。最终还要将完整的命令(16进制字符串,其中包含开始、结束符号以及中文的16进制字符串)转换为字节数组交给 outputStream 发送给串口设备。
    public static void main(String[] args) throws UnsupportedEncodingException {
        String s = "中国";
        String ss = bytes2HexString(s.getBytes("GB2312"));
        System.out.println(s+"的hex String:"+ss);
        System.out.println(ss + "的字符串是:" + hexStr2Str(ss,"GB2312"));
    }
工具类的方法 ByteUtils.hexStr2Byte 将发送指令作为16进制字符串转换为字节数组并发送给串口设备
发送指令
向串口设备发送指令有两种方式:发送字符串(也叫做按照ASC码发送)、发送16进制(也叫发送16进制) 分别对应
// 发送字符串 - 以 ASCⅡ 形式发送
SerialPortManager.sendToPort(serialportObj, stringValue.getBytes());
// 发送16进制字符串 - 以16进制形式发送
SerialPortManager.sendToPort(serialportObj, ByteUtils.hexStr2Byte(stringValue));
工具
中文与编码工具
package com.xdf.callcenter.utils;

import java.io.UnsupportedEncodingException;

/**
 * @author chanchaw
 * @create 2022-11-20 8:31
 */
public class ChineseHex {
    /**
     * 字节数组转换成为十六进制字符串
     * @param b 字节数组(指定了字符集的)
     * @return 16进制字符串(可使用16进制字符串表示中文)
     */
    public static String bytes2HexString(byte[] b) {
        StringBuilder sb = new StringBuilder();
        for(int i=0;i<b.length;i++) {
            sb.append(String.format("%02x", b[i]));
        }
        return sb.toString();
    }

    /**
     * 字符串转换为字节数组
     * @param content 字符串,可以是英文数字中文甚至符号
     * @param charSet 转换时使用的字符串,中文一般使用GB2312
     * @return 字节数组
     */
    public static byte[] String2Bytes(String content,String charSet){
        try {
            byte[] bytes = content.getBytes(charSet);
            return bytes;
        } catch (UnsupportedEncodingException e) {
            throw new RuntimeException("字符串" + content + "转换为字节数组时出现异常!");
        }
    }

    /**
     * 将字符串转换16进制字符串。一般用于将中文转换为16进制字符串
     * @param content 被转换的字符串
     * @param charSet 字符集,例如GB2312
     * @return 转换后的16进制字符串
     */
    public static String String2HexString(String content,String charSet){
        byte[] bytes = String2Bytes(content,charSet);
        return bytes2HexString(bytes);
    }

    /**
     * 16进制直接转换成为字符串(无需Unicode解码)
     * @param hexString  Byte字符串(Byte之间无分隔符
     * @param charSet 字符集,例如GB2312,GBK等
     * @return 对应的字符串
     */
    public static String hexStr2Str(String hexString,String charSet) {
        String hexStr = "";
        String str = "0123456789ABCDEF"; //16进制能用到的所有字符 0-15
        for(int i=0;i<hexString.length();i++){
            String s = hexString.substring(i, i+1);
            if(s.equals("a")||s.equals("b")||s.equals("c")||s.equals("d")||s.equals("e")||s.equals("f")){
                s=s.toUpperCase().substring(0, 1);
            }
            hexStr+=s;
        }

        char[] hexs = hexStr.toCharArray();//toCharArray() 方法将字符串转换为字符数组。
        int length = (hexStr.length() / 2);//1个byte数值 -> 两个16进制字符
        byte[] bytes = new byte[length];
        int n;
        for (int i = 0; i < bytes.length; i++) {
            int position = i * 2;//两个16进制字符 -> 1个byte数值
            n = str.indexOf(hexs[position]) * 16;
            n += str.indexOf(hexs[position + 1]);
            // 保持二进制补码的一致性 因为byte类型字符是8bit的  而int为32bit 会自动补齐高位1  所以与上0xFF之后可以保持高位一致性
            //当byte要转化为int的时候,高的24位必然会补1,这样,其二进制补码其实已经不一致了,&0xff可以将高的24位置为0,低8位保持原样,这样做的目的就是为了保证二进制数据的一致性。
            bytes[i] = (byte) (n & 0xff);
        }
        String name = "";
        try {
            name = new String(bytes,charSet);
        } catch (UnsupportedEncodingException e) {
            e.printStackTrace();
        }

        return name;
    }

    public static void main(String[] args) throws UnsupportedEncodingException {
        String s = "中国";
        String ss = bytes2HexString(s.getBytes("GB2312"));
        System.out.println(s+"的hex String:"+ss);
        System.out.println(ss + "的字符串是:" + hexStr2Str(ss,"GB2312"));
    }
}
字节数组工具
package com.xdf.callcenter.utils;

import java.nio.ByteBuffer;
import java.util.Locale;

/**
 * Byte转换工具
 *
 * @author yangle
 */
public class ByteUtils {

	/**
	 * 十六进制字符串转byte[]
	 *
	 * @param hex
	 *            十六进制字符串
	 * @return byte[]
	 */
	public static byte[] hexStr2Byte(String hex) {
		if (hex == null) {
			return new byte[] {};
		}

		// 奇数位补0
		if (hex.length() % 2 != 0) {
			hex = "0" + hex;
		}

		int length = hex.length();
		ByteBuffer buffer = ByteBuffer.allocate(length / 2);
		for (int i = 0; i < length; i++) {
			String hexStr = hex.charAt(i) + "";
			i++;
			hexStr += hex.charAt(i);
			byte b = (byte) Integer.parseInt(hexStr, 16);
			buffer.put(b);
		}
		return buffer.array();
	}

	/**
	 * byte[]转十六进制字符串
	 *
	 * @param array
	 *            byte[]
	 * @return 十六进制字符串
	 */
	public static String byteArrayToHexString(byte[] array) {
		if (array == null) {
			return "";
		}
		StringBuffer buffer = new StringBuffer();
		for (int i = 0; i < array.length; i++) {
			buffer.append(byteToHex(array[i]));
		}
		return buffer.toString();
	}

	/**
	 * byte转十六进制字符
	 *
	 * @param b
	 *            byte
	 * @return 十六进制字符
	 */
	public static String byteToHex(byte b) {
		String hex = Integer.toHexString(b & 0xFF);
		if (hex.length() == 1) {
			hex = '0' + hex;
		}
		return hex.toUpperCase(Locale.getDefault());
	}
}
安装与部署
开发环境
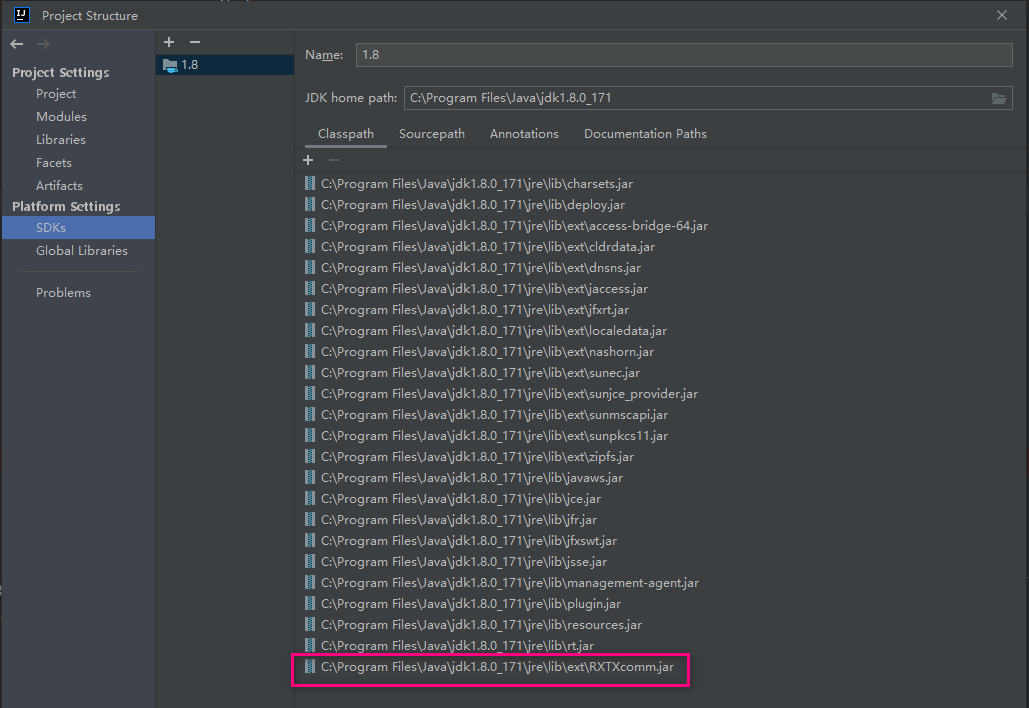
将驱动压缩包解压后,文件 RXTXcomm.jar 拷贝到 C:\Program Files\Java\jdk1.8.0_171\jre\lib\ext 下 rxtxParallel.dll 和 rxtxSerial.dll 拷贝到 C:\Program Files\Java\jdk1.8.0_171\jre\bin 下 初次使用在织造企业呼叫系统中,制作的是 springboot 项目,需要在 IDEA 的工程设置中引入 jar 包
部署生产环境
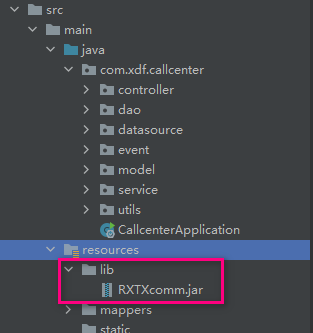
工程 lib 目录
pom.xml
在文件 pom.xml 中配置下面代码通过 maven 打包成 jar 时会将 RXTXcomm.jar 编译到 callcenter-0.0.1-SNAPSHOT.jar\BOOT-INF\lib 下
 <build>
      <plugins>
          <plugin>
              <groupId>org.springframework.boot</groupId>
              <artifactId>spring-boot-maven-plugin</artifactId>
              <configuration>
                  <excludes>
                      <exclude>
                          <groupId>org.projectlombok</groupId>
                          <artifactId>lombok</artifactId>
                      </exclude>
                  </excludes>
              </configuration>
          </plugin>
          <plugin>
              <groupId>org.apache.maven.plugins</groupId>
              <artifactId>maven-compiler-plugin</artifactId>
              <version>${maven-compiler-plugin.version}</version>
              <configuration>
                  <source>1.8</source>
                  <target>1.8</target>
                  <skip>true</skip>
                  <encoding>UTF-8</encoding>
                  <compilerArguments>
                      <extdirs>${project.basedir}/src/main/resources/lib</extdirs>
                  </compilerArguments>
              </configuration>
          </plugin>
      </plugins>

      <!-- 主要配置:将引用的第三方 jar 包打进生成的 jar 文件的 BOOT-INF/lib 目录中 -->
      <resources>
          <resource>
              <directory>src\main\resources\lib</directory>
              <targetPath>BOOT-INF\lib</targetPath>
              <!--  <includes>
                    <include>**/*.jar</include>
                </includes>-->
          </resource>
          <resource>
              <directory>src/main/resources</directory>
          </resource>
      </resources>
  </build>
生产环境部署 dll
将文件 rxtxParallel.dll 和 rxtxSerial.dll 拷贝到 WIN 电脑的 sysWOW64 下和 32 下,正常启动 jar 文件即可 注意,在 windows server 2008 上部署运行失败,win7 64位上部署成功