微服务实战电商
工程与部署
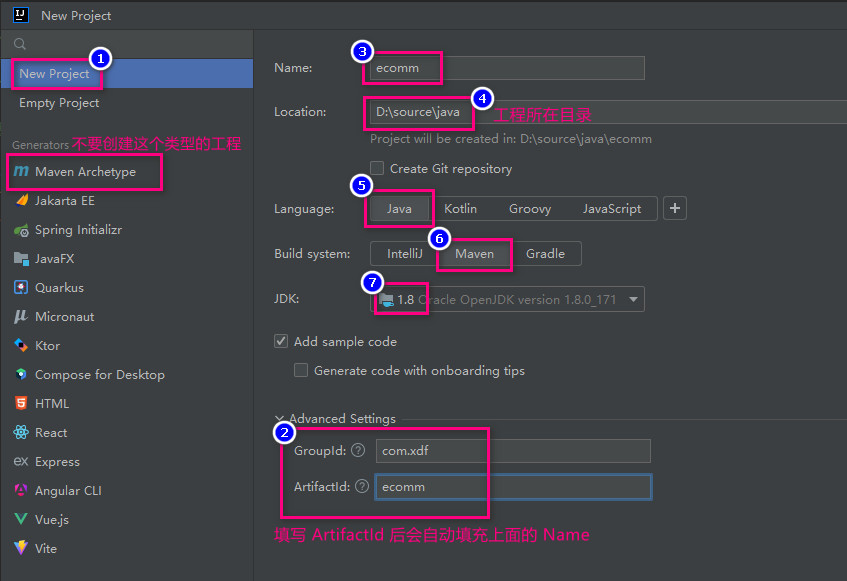
创建工程
本项目采用单工程多模块的方式开发微服务项目,创建如下图的 maven 工程。具体的每个微服务是一个单独的模块,所以工程目录下的 src 目录不会写代码,可以删除掉。
下面是工程 pom 文件的全部代码
<?xml version="1.0" encoding="UTF-8"?>
<project xmlns="http://maven.apache.org/POM/4.0.0"
         xmlns:xsi="http://www.w3.org/2001/XMLSchema-instance"
         xsi:schemaLocation="http://maven.apache.org/POM/4.0.0 http://maven.apache.org/xsd/maven-4.0.0.xsd">
    <modelVersion>4.0.0</modelVersion>

    <groupId>com.xdf</groupId>
    <artifactId>ecomm</artifactId>
    <version>1.0-SNAPSHOT</version>

    <!-- 具体的每个微服务此处是 jar,付工程只为所有微服务提供 pom 依赖,所以这里是 pom 而不是 jar -->
    <packaging>pom</packaging>

    <parent>
        <groupId>org.springframework.boot</groupId>
        <artifactId>spring-boot-starter-parent</artifactId>
        <version>2.3.1.RELEASE</version>
    </parent>

    <properties>
        <spring-cloud.version>Hoxton.SR8</spring-cloud.version>
        <spring-cloud-alibaba.version>2.2.4.RELEASE</spring-cloud-alibaba.version>
    </properties>

    <dependencies>
        <!-- 需要 IDEA 添加 lombok 插件 -->
        <dependency>
            <groupId>org.projectlombok</groupId>
            <artifactId>lombok</artifactId>
            <version>1.16.18</version>
        </dependency>
        <dependency>
            <groupId>org.springframework.boot</groupId>
            <artifactId>spring-boot-starter-test</artifactId>
            <scope>test</scope>
        </dependency>
        <dependency>
            <groupId>org.springframework.boot</groupId>
            <artifactId>spring-boot-starter-actuator</artifactId>
        </dependency>
        <dependency>
            <groupId>org.apache.commons</groupId>
            <artifactId>commons-lang3</artifactId>
            <version>3.11</version>
        </dependency>
        <dependency>
            <groupId>org.apache.commons</groupId>
            <artifactId>commons-collections4</artifactId>
            <version>4.4</version>
        </dependency>
        <dependency>
            <groupId>cn.hutool</groupId>
            <artifactId>hutool-all</artifactId>
            <version>5.6.0</version>
        </dependency>
        <dependency>
            <groupId>io.jsonwebtoken</groupId>
            <artifactId>jjwt-api</artifactId>
            <version>0.10.5</version>
        </dependency>
        <dependency>
            <groupId>io.jsonwebtoken</groupId>
            <artifactId>jjwt-impl</artifactId>
            <version>0.10.5</version>
            <scope>runtime</scope>
        </dependency>
        <dependency>
            <groupId>io.jsonwebtoken</groupId>
            <artifactId>jjwt-jackson</artifactId>
            <version>0.10.5</version>
            <scope>runtime</scope>
        </dependency>
        <dependency>
            <groupId>com.alibaba</groupId>
            <artifactId>fastjson</artifactId>
            <version>1.2.47</version>
        </dependency>
    </dependencies>

    <dependencyManagement>
        <dependencies>
            <dependency>
                <groupId>org.springframework.cloud</groupId>
                <artifactId>spring-cloud-dependencies</artifactId>
                <version>${spring-cloud.version}</version>
                <type>pom</type>
                <scope>import</scope>
            </dependency>
            <dependency>
                <groupId>com.alibaba.cloud</groupId>
                <artifactId>spring-cloud-alibaba-dependencies</artifactId>
                <version>${spring-cloud-alibaba.version}</version>
                <type>pom</type>
                <scope>import</scope>
            </dependency>
        </dependencies>
    </dependencyManagement>

    <!-- 配置远程仓库 -->
    <repositories>
        <repository>
            <id>spring-milestones</id>
            <name>Spring Milestones</name>
            <url>https://repo.spring.io/milestone</url>
            <snapshots>
                <enabled>false</enabled>
            </snapshots>
        </repository>
    </repositories>
</project>
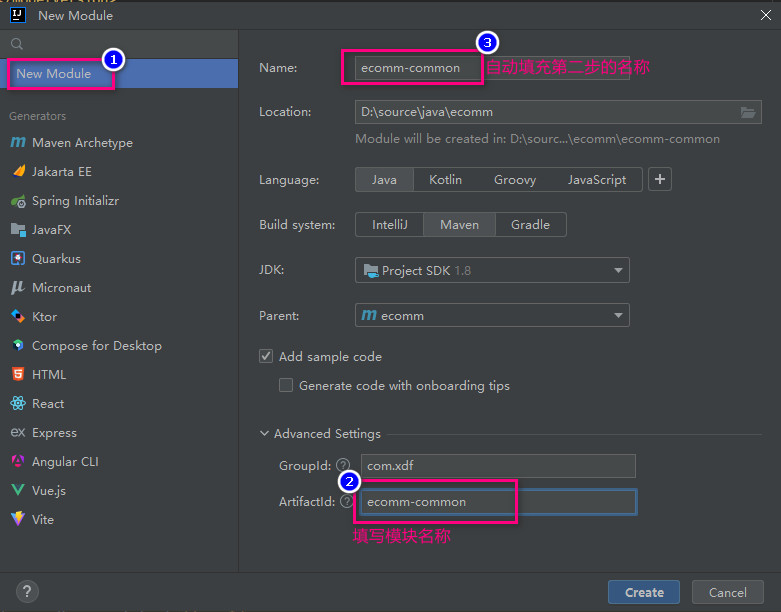
创建第一个模块
创建公用模块 common ,也是项目的第一个模块
启动微服务
在创建一个微服务后通过下面方法罗列本工程下的所有微服务并进行启停操作

nacos
在 xdf250 的虚拟机中安装了 ubuntu24 系统,IP 地址是 192.168.0.88,在其中安装了 nacos2.x ,访问账号和密码都采用默认的 nacos,安装的 docker 版本,测试访问通过,数据库是自己的开发用电脑上 ecomm-nacos
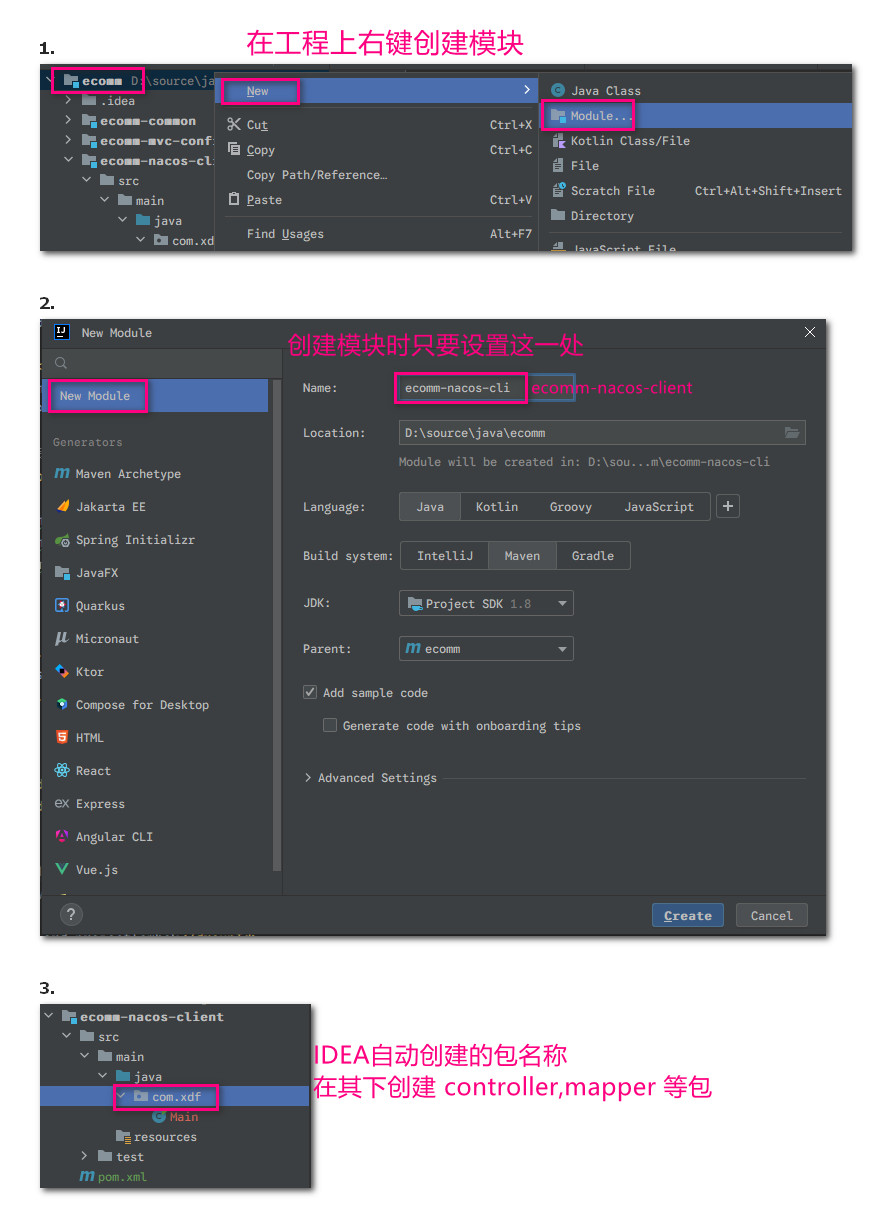
一个 nacos 可以提供给多个项目使用,此时要通过命名空间区分,即一个命名空间表示一个项目。下面是创建 nacos-client 的技术验证用模块
引入 nacos 后名称为 bootstrap.yml 的优先级高于 application.yml,并且考虑到之后会用到 nacos 的共享配置 ,重要的公共的配置项都写在 bootstrap.yml 中,下面是该文件的全部代码
server:
  port: 8000
  servlet:
    context-path: /ecomm-nacos-client

spring:
  application:
    name: ecomm-nacos-client
  cloud:
    nacos:
      discovery:
        enabled: true
        server-addr: 192.168.0.88:8848
        namespace: 8f53d4a1-e0fa-4962-b8e3-e540b6961d42
# springboot actuator 暴露断点
management:
  endpoints:
    web:
      exposure:
        include: '*'
  endpoint:
    health:
      show-details: always
通过快捷键 alt+8 打开服务列表启动该服务,然后到 192.168.0.88:8848 的服务列表查看命名空间 ecomm 下会出现该微服务。
Springboot Admin 微服务监控
SpringBoot Actuator
Endpoints是Actuator的核心部分,它用来监视应用程序交互,SpringBoot Actuator内置了很多Endpoints,并支持扩展SpringBoot Actuator提供的原生端点有三类- 应用配置类:自动配置信息、
Spring Bean信息、yml文件信息、环境信息等等 - 度量指标类:主要是运行期间的动态信息,例如堆栈、健康指标、
metrics信息等等 - 操作控制类:主要是指
shutdown,用户可以发送一个请求将应用的监控功能关闭
- 应用配置类:自动配置信息、
SpringBoot Admin
制作实现
按照如下步骤制作一个模块实现 SpringBoot Admin ,可监控所有微服务(在 Admin 服务中配置 nacos,通过后者发现并监控其他所有微服务)
制作的 Admin 微服务模块 pom.xml 全部代码如下
<?xml version="1.0" encoding="UTF-8"?>
<project xmlns="http://maven.apache.org/POM/4.0.0"
         xmlns:xsi="http://www.w3.org/2001/XMLSchema-instance"
         xsi:schemaLocation="http://maven.apache.org/POM/4.0.0 http://maven.apache.org/xsd/maven-4.0.0.xsd">
    <modelVersion>4.0.0</modelVersion>
    <parent>
        <groupId>com.xdf</groupId>
        <artifactId>ecomm</artifactId>
        <version>1.0-SNAPSHOT</version>
    </parent>

    <artifactId>ecomm-admin</artifactId>
    <version>1.0-SNAPSHOT</version>
    <packaging>jar</packaging>

    <name>ecomm-admin</name>
    <description>监控服务器</description>

    <dependencies>
        <dependency>
            <groupId>com.alibaba.cloud</groupId>
            <artifactId>spring-cloud-starter-alibaba-nacos-discovery</artifactId>
            <version>2.2.3.RELEASE</version>
        </dependency>
        <dependency>
            <groupId>de.codecentric</groupId>
            <artifactId>spring-boot-admin-starter-server</artifactId>
            <version>2.2.0</version>
        </dependency>
        <dependency>
            <groupId>com.xdf</groupId>
            <artifactId>ecomm-mvc-config</artifactId>
            <version>1.0-SNAPSHOT</version>
        </dependency>
        <dependency>
            <groupId>org.springframework.boot</groupId>
            <artifactId>spring-boot-starter-security</artifactId>
        </dependency>
    </dependencies>

    <build>
        <finalName>${artifactId}</finalName>
        <plugins>
            <plugin>
                <groupId>org.springframework.boot</groupId>
                <artifactId>spring-boot-maven-plugin</artifactId>
                <executions>
                    <execution>
                        <goals>
                            <goal>repackage</goal>
                        </goals>
                    </execution>
                </executions>
            </plugin>
        </plugins>
    </build>

    <repositories>
        <repository>
            <id>spring-milestones</id>
            <name>Spring Milestones</name>
            <url>https://repo.spring.io/milestone</url>
            <snapshots>
                <enabled>false</enabled>
            </snapshots>
        </repository>
    </repositories>

<!--    <properties>-->
<!--        <maven.compiler.source>8</maven.compiler.source>-->
<!--        <maven.compiler.target>8</maven.compiler.target>-->
<!--        <project.build.sourceEncoding>UTF-8</project.build.sourceEncoding>-->
<!--    </properties>-->

</project>
在 Admin 服务配置文件 bootstrap.yml 中设置暴露端点,其他所有微服务都要在配置文件设置如下
server:
  port: 7111
  servlet:
    context-path: /ecomm-admin
spring:
  security:
    user:
      name: chanchaw
      password: 7758chanchaw
  application:
    name: ecomm-admin
  cloud:
    nacos:
      discovery:
        enabled: true
        server-addr: 192.168.0.88:8848
        namespace: 8f53d4a1-e0fa-4962-b8e3-e540b6961d42
        metadata:
          management:
            context-path: ${server.servlet.context-path}/actuator
          user.name: chanchaw
          user.password: 7758chanchaw
  thymeleaf:
    check-template: false
    check-template-location: false

management:
  endpoints:
    web:
      exposure:
        include: '*' # 默认只打开 health 和 info 两个断点,通过设置 * 开放所有断点
  endpoint:
    health:
      show-details: always
上面配置中根节点 management 是设置端点,上面的 spring.cloud.nacos.discovery.metadata.management.context-path 也是必须设置的点,下面的 user.name 和 user.password 是结合 SpringSecurity 实现登录认证的功能。
根据项目配置文件 bootstrap.yml 访问项目 http://localhost:7111/ecomm-admin,创建并启动测试成功后的提交是 dc02562996ca67a98a1a05bdd985179e5d79dcea,仓库地址是 https://gitee.com/chanchaw/ecomm
自定义告警
在微服务 ecomm-admin 中制作了类 MyCustomNotifier.java 实现事件通知,当微服务状态变更时可以打印日期、发送微信消息,钉钉消息等等,都需要自己制作。
认证与授权
JWT
JWT = JSON Web Token ,是一个开放标准,它定义了一种紧凑的、自包含的方式,用于作为 JSON 对象在各方之间安全的传输信息。
JWT 由三部分组成:Header、Payload、Signature ,且用圆点连接 xxxx.yyyy.zzzz:
Header- 由两部分(Token类型、加密算法名称)组成,并使用Base64编码Payload-KV形式的数据,即你想传递的数据(授权的话就是token信息)Signature- 为了得到签名部分,你必须有Base64编码过的Header、Base64编码过的payload、一个密钥,签名算法是Header中指定的,然后对前面两者进行签名即可:HMACSHA256(base64UrlEncode(header) + "." + base64UrlEncode(payload), secret)
public static Map<String,String> generateKeyBytes() throws NoSuchAlgorithmException {
    KeyPairGenerator rsa = KeyPairGenerator.getInstance("RSA");
    rsa.initialize(2048);// RSA要求最小2048长度
    KeyPair keyPair = rsa.generateKeyPair();
    RSAPublicKey publicKey = (RSAPublicKey) keyPair.getPublic();
    RSAPrivateKey privateKey = (RSAPrivateKey) keyPair.getPrivate();

    String publicKeyStr = Base64.encode(publicKey.getEncoded());
    String privateKeyStr = Base64.encode(privateKey.getEncoded());

    HashMap<String, String> ret = new HashMap<>();
    ret.put("publicKey",publicKeyStr);
    ret.put("privateKey",privateKeyStr);
    System.out.println("RSA生成的公钥、私钥依次是:\n" + publicKeyStr + "\n" + privateKeyStr);
    return ret;
}