mybatis
时间类型对应关系
| MySQL | Mybatis-resultType | jdbcType | Java |
|---|---|---|---|
| varchar | VARCHAR | VARCHAR | String |
| int | INTEGER | INTEGER | Integer |
| float | REAL | REAL | Float |
| double | DOUBLE | DOUBLE | Double |
| decimal | DECIMAL | DECIMAL | BigDecimal |
| datetime | TIMESTAMP | TIMESTAMP | Date |
| bit | BIT | BIT | Boolean |
| tinyint | TINYINT | TINYINT | Byte |
| bigint | Long | BIGINT | Long |
如果只要日期,不要时间则数据类型是:jdbcType=DATE
打印sql
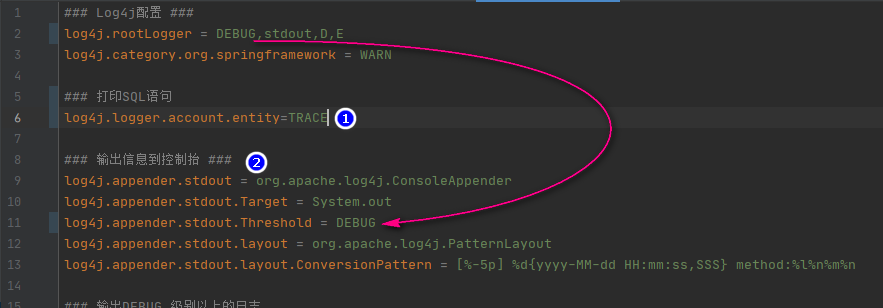
2021年11月19日 在白坯系统中测试通过的方法
在配置文件 application-dev.yml 中做下面的配置。最后一行打印指定包下执行的SQL,使用 trace 会打印出 DB 返回来的数据 ,如果更换为 debug 则在打印SQL语句以及填充的参数后只会返回影响的行数,不会打印具体的数据
logging:
  charset:
    file: UTF-8
  file:
    path: D:/logback
  level:
    root: info
    com.xdf.whiteaccount.dao: trace
2022年9月30日 08:03:08
由于日志要设置滚动压缩储存的策略,还是选择使用 xml 格式的文件进行配置。那么不需要在 yml 文件中像上面一样配置,只要在 logback-spring.xml 中如下配置
<?xml version="1.0" encoding="UTF-8"?>
<!--
scan="true" - 当本配置文件有变动会自动扫描并且应用到软件中
scanPeriod - 1分钟检测配置文件一次
debug = "false" - 不打印 logback 内部运行日志
-->
<configuration  scan="true" scanPeriod="60 seconds" debug="false">
  <contextName>zipperdye</contextName>

  <!-- 日志文件内容显示的格式 -->
  <property name="out.pattern" value="%d{yyyy-MM-dd HH:mm:ss.SSS} [%-5p] [%t] [%c][%L] - %m%n" />
  <!-- 指定日志文件的存放路径,后面使用 ${log.path} 引用该变量 -->
  <property name="log.path" value="/sbJarLogs/zipperdye" />
  <!-- 活动文件的最大大小 - 100MB -->
  <property name="max.file.size" value="100MB"/>
  <!-- 保留的日志文件的最大数量 -->
  <property name="max.history" value="30"/>
  <!-- 所有日志文件累加起来最大容量 -->
  <property name="total.size.cap" value="15GB"/>

    <appender name="zipperdye" class="ch.qos.logback.core.rolling.RollingFileAppender">
    <file>${log.path}/zipperdye.log</file>
    <rollingPolicy class="ch.qos.logback.core.rolling.TimeBasedRollingPolicy">
    <!--日志文件输出的文件名-->
    <FileNamePattern>${log.path}/zipperdye.%d{yyyy-MM-dd}.log</FileNamePattern>
    <MaxHistory>30</MaxHistory>
  </rollingPolicy>
    <encoder>
    <!--格式化输出:%d表示日期,%thread表示线程名,%-5level:级别从左显示5个字符宽度%msg:日志消息,%n是换行符-->
    <pattern>%d{yyyy-MM-dd HH:mm:ss.SSS} %-5level %logger{50} - %msg%n</pattern>
  </encoder>
    <!--日志文件最大的大小-->
    <triggeringPolicy class="ch.qos.logback.core.rolling.SizeBasedTriggeringPolicy">
    <MaxFileSize>30MB</MaxFileSize>
  </triggeringPolicy>
  </appender>

  <root level="trace">
    <appender-ref ref="zipperdye" />
  </root>

  </configuration>
上面行号38的 trace 打印查询的日志如下 - 会打印查询数据库返回的数据 trace模式,打印响应来的数据2022-09-30 08:01:53.593 DEBUG c.x.z.d.business.ContactMapper.selectByPrimaryKey - >
Preparing: select iid, sid, sname, category_sid, alias, sales_man,remark,state,nullify_time,nullify_remark,nullify_operator,nullify_ip, create_time from contact where iid = ? 2022-09-30 08:01:53.596 DEBUG c.x.z.d.business.ContactMapper.selectByPrimaryKey - > Parameters: 12(Integer) 2022-09-30 08:01:53.599 TRACE c.x.z.d.business.ContactMapper.selectByPrimaryKey - < Columns: iid, sid, sname, category_sid, alias, sales_man, remark, state, nullify_time, nullify_remark, nullify_operator, nullify_ip, create_time 2022-09-30 08:01:53.600 TRACE c.x.z.d.business.ContactMapper.selectByPrimaryKey - < Row: 12, 1012, 睿鑫, , , , , 1, 2022-05-23 11:26:28, , , , 2022-05-23 11:26:28 2022-09-30 08:01:53.601 DEBUG c.x.z.d.business.ContactMapper.selectByPrimaryKey - <== Total: 1 如果使用 debug 模式则不会返回数据,只会打印出 sql 语句和传递的参数 debug模式,打印sql2022-09-30 07:51:58.746 DEBUG c.x.z.d.business.ContactMapper.selectByPrimaryKey - ==> Preparing: select iid, sid, sname, category_sid, alias, sales_man, remark,state,nullify_time,nullify_remark,nullify_operator,nullify_ip, create_time from contact where iid = ? 2022-09-30 07:51:58.746 DEBUG c.x.z.d.business.ContactMapper.selectByPrimaryKey - > Parameters: 12(Integer) 2022-09-30 07:51:58.753 DEBUG c.x.z.d.business.ContactMapper.selectByPrimaryKey - < Total: 1
获取自增主键
单行数据
如果是插入单行数据,将下面的代码拷贝到 insert 之前即可
<selectKey resultType="java.lang.Integer" order="AFTER" keyProperty="id">
  SELECT LAST_INSERT_ID()
</selectKey>
最终在XxxMapper.xml 中 insert 的完整代码如下,注意 keyProperty 应该填写DB表中自增的字段名称 向DB中插入新值后DB会在字段 iid 上产生一个新的值,mybatis 会将该值填充到传入参数中 java 模型上该字段对应的属性上
  <insert id="insert" parameterType="com.ccsoft.gsms.model.CompositionDetail">
    <selectKey resultType="java.lang.Integer" order="AFTER" keyProperty="iid">
      SELECT LAST_INSERT_ID()
    </selectKey>

    insert into composition_detail (iid, type_sid, type_name,
      sid, cname, invalid, seq,
      create_time)
    values (#{iid,jdbcType=INTEGER}, #{type_sid,jdbcType=VARCHAR}, #{type_name,jdbcType=VARCHAR},
      #{sid,jdbcType=VARCHAR}, #{cname,jdbcType=VARCHAR}, #{invalid,jdbcType=BIT}, #{seq,jdbcType=INTEGER},
      #{create_time,jdbcType=TIMESTAMP})
  </insert>
即,像下面的服务实现类的方法,传入的 record 中 iid 是空值,当在DB中新增结束后,再访问 record.getIid() 就有值了
    @Override
    public CompositionDetail insert(CompositionDetail record) {....}
多行数据
如果是 Java 通过 list 批量插入数据,则使用下面的方法
<insert id="insertBatch" parameterType="java.util.List" useGeneratedKeys="true" keyProperty="id">
    insert into orderdetail (id,mainid, ordercode,
      oordercode, stylecode, goodsname,
      spec01, spec02, size,
      colorcode, colorname, color,
      meter, kg, yard, price,
      amount, platemake, sample, remark,
      createtime, creator, updatetime,
      updater)
    values
    <foreach collection ="list" item="ele" index= "index" separator =",">
		(#{ele.id,jdbcType=INTEGER},#{ele.mainid,jdbcType=INTEGER}, #{ele.ordercode,jdbcType=VARCHAR},
      #{ele.oordercode,jdbcType=VARCHAR}, #{ele.stylecode,jdbcType=VARCHAR}, #{ele.goodsname,jdbcType=VARCHAR},
      #{ele.spec01,jdbcType=VARCHAR}, #{ele.spec02,jdbcType=VARCHAR}, #{ele.size,jdbcType=VARCHAR},
      #{ele.colorcode,jdbcType=VARCHAR}, #{ele.colorname,jdbcType=VARCHAR}, #{ele.color,jdbcType=VARCHAR},
      #{ele.meter,jdbcType=REAL}, #{ele.kg,jdbcType=REAL}, #{ele.yard,jdbcType=REAL}, #{ele.price,jdbcType=REAL},
      #{ele.amount,jdbcType=REAL}, #{ele.platemake,jdbcType=REAL}, #{ele.sample,jdbcType=REAL}, #{ele.remark,jdbcType=VARCHAR},
      #{ele.createtime,jdbcType=TIMESTAMP}, #{ele.creator,jdbcType=VARCHAR}, #{ele.updatetime,jdbcType=TIMESTAMP},
      #{ele.updater,jdbcType=VARCHAR})
      </foreach >
  </insert>
上面的属性useGeneratedKeys表示开启自增,属性keyProperty表示自增的字段的名称,在Java端的服务类中作为传入参数的list在执行插入之后其自增的字段就被Mybatis赋予DB端自动生成的值了
sqlserver 的自增
在新增函数中使用下面代码
<selectKey resultType="java.lang.Integer" order="AFTER" keyProperty="b_ItemID">
  SELECT @@IDENTITY
</selectKey>
传参符号$#的区别
#{} 的方式可以防止SQL注入,执行之前要做预编译处理,先将#{} 替换为?,然后将参数值 4,11,23 在两边添加单引号后替换到占位符?(由于添加了单引号可以避免SQL注入),会形成下面的效果:
select * from goods where 1=1
and goods_type in ('4,11,23')
in 后面应该是:in('4','11','23'),才能正确的查询出结果。 ${},不像 #{} 会在两边添加单引号而是直接替换到对应位置,所以可能引发SQL注入。DAO接口方法中的参数前面要使用 @param,对应XML中使用变量名称要保证和DAO接口方法的参数一致
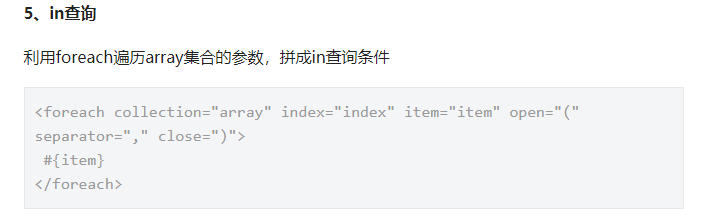
这种情况要用到 Mybatis 的 foreach 标签了。例如:
<delete id="deleteBatch">
	delete from user where id in
  <foreach collection="array" item="id" index="index" open="(" close=")" separator=",">
  	#{id}
  </foreach>
</delete>
多种sql语句的写法
返回数组
# 下面是 xml 中的 sql 语句
<select id="getDistClient8PrimaryKeyList" parameterType="java.util.List" resultType="java.lang.String">
    select DISTINCT b.contact_company_id
    from jrkbillsum a left join plan b on a.planid=b.id
    where a.id in
    <foreach collection="list" item="i" open="(" close=")" separator=",">
        #{i,jdbcType=INTEGER}
    </foreach>
    ;
</select>

# 对应的 java 代码接受
List<String> getDistClient8PrimaryKeyList(List<Integer> jrkbillSumIdList);

# 如果返回的是对象数组则 resultType 修改为 resultMap,即:resultMap="BaseResultMap"
# 或者指定为其他模型类:resultMap="com.xdf.whiteaccount.entity.Jrkbillsum"
注解自定义sql
使用注解的方式就不需要到对应的 xml 文件中写代码了:
@Select("call usp_getAuditorsInMill(#{mill})")
List<User> selectAuditorsInMill(String mill);
同样的,不光 select 可以使用注解,修改数据也可以:
@Update("UPDATE user SET real_name=#{realName} WHERE open_id=#{openId};")
Integer updateRealName(String openId,String realName);
in 查询
  <select id="multSelectByIds" resultMap="BaseResultMap">
    select * from plan where iid IN
    <foreach collection="list" separator="," index="index" item="item" open="(" close=")">
      #{item,jdbcType=INTEGER}
    </foreach>
  </select>
if 标签拼接SQL
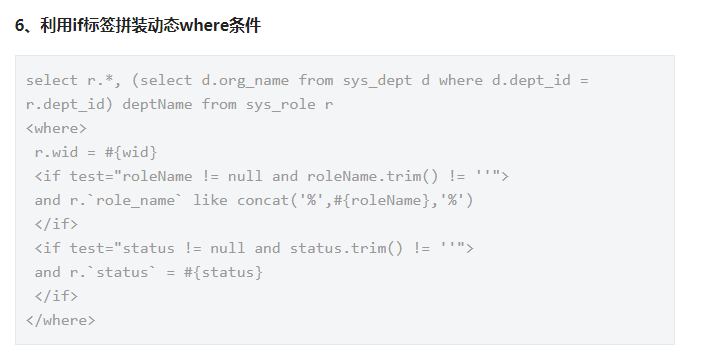
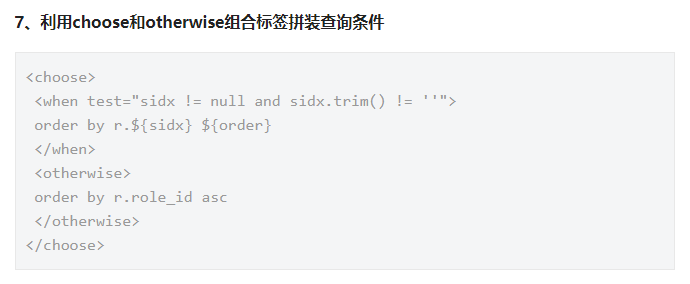
choose 拼接
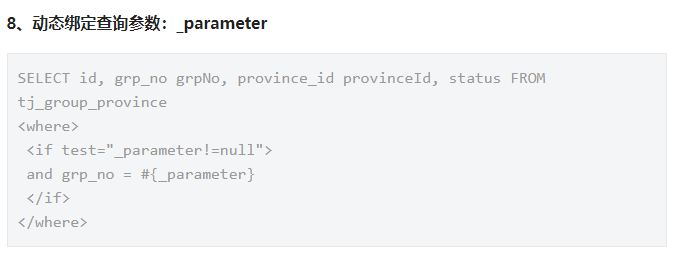
动态绑定查询参数
集合操作
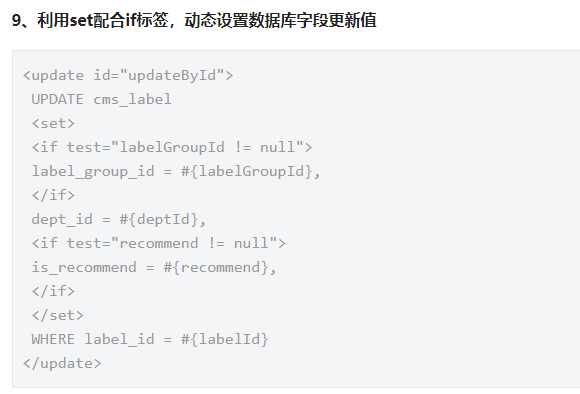
批量选择性修改
下面的方法会拼接出N个 update cp_detail set xx1=xx1,xx2=xx2 where iid = iid1; update cp_detail set xx1=xx1,xx2=xx2 where iid = iid2;
<update id="multiUpdateSelective3" parameterType="java.util.List" >
	<foreach collection="list" item="item" index="index" separator=";">
		UPDATE cp_detail
		<set>
		<if test="item.iid >0 and item.parent_id != null" >
		  parent_id = #{item.parent_id},
		</if>

		<if test="item.iid >0 and item.plan_id != null" >
		  plan_id = #{item.plan_id},
		</if>

		<if test="item.iid >0 and item.original_id != null" >
		  original_id = #{item.original_id},
		</if>
		</set>
		where iid = #{item.iid}
	</foreach>
</update>
所以要在连接数据库的字串中使用
&allowMultiQueries=true
批量选择性新增/修改
2022年9月14日 15:00:23 测试上面的“批量选择性修改”在制作旭纸业批量审核时没有测试通过,使用本方法 “批量选择性新增/修改”测试通过 下面的方法同样是批量操作,不过比上面的方法多了新增的方法。如果主键存在则修改,不存在则新增。所以使用下面的方法则不需要使用上面的方法
<insert id="multiSave" parameterType="java.util.List">
    <selectKey resultType="java.lang.Integer" keyProperty="iid" order="AFTER">
    SELECT LAST_INSERT_ID()
    </selectKey>

    <foreach collection ="list" item="ele" index= "index" separator =";">
      insert into order_detail
      <trim prefix="(" suffix=")" suffixOverrides=",">
        <if test="ele.iid != null"> iid, </if>
        <if test="ele.parent_id != null"> parent_id, </if>
        <if test="ele.product_sid != null"> product_sid, </if>
        <if test="ele.specification != null"> specification, </if>
        <if test="ele.color != null"> color, </if>
        <if test="ele.color_code != null"> color_code, </if>
        <if test="ele.color_block != null"> color_block, </if>
        <if test="ele.amount != null"> amount, </if>
        <if test="ele.kilo != null"> kilo, </if>
        <if test="ele.price != null"> price, </if>
        <if test="ele.money != null"> money, </if>
        <if test="ele.delivery_date != null"> delivery_date, </if>
        <if test="ele.remark != null"> remark, </if>
        <if test="ele.audit != null"> audit, </if>
        <if test="ele.state != null"> state, </if>
        <if test="ele.finished != null"> finished, </if>
        <if test="ele.operator != null"> operator, </if>
      </trim>
      values
      <trim prefix="(" suffix=")" suffixOverrides=",">
        <if test="ele.iid != null"> #{ele.iid},</if>
        <if test="ele.parent_id != null"> #{ele.parent_id},</if>
        <if test="ele.product_sid != null"> #{ele.product_sid},</if>
        <if test="ele.specification != null"> #{ele.specification},</if>
        <if test="ele.color != null"> #{ele.color},</if>
        <if test="ele.color_code != null"> #{ele.color_code},</if>
        <if test="ele.color_block != null"> #{ele.color_block},</if>
        <if test="ele.amount != null"> #{ele.amount},</if>
        <if test="ele.kilo != null"> #{ele.kilo},</if>
        <if test="ele.price != null"> #{ele.price},</if>
        <if test="ele.money != null"> #{ele.money},</if>
        <if test="ele.delivery_date != null"> #{ele.delivery_date},</if>
        <if test="ele.remark != null"> #{ele.remark},</if>
        <if test="ele.audit != null"> #{ele.audit},</if>
        <if test="ele.state != null"> #{ele.state},</if>
        <if test="ele.finished != null"> #{ele.finished},</if>
        <if test="ele.operator != null"> #{ele.operator},</if>
      </trim>
      ON DUPLICATE KEY UPDATE
      <trim suffixOverrides=",">
        <if test="ele.parent_id != null"> parent_id = #{ele.parent_id}, </if>
        <if test="ele.product_sid != null"> product_sid = #{ele.product_sid}, </if>
        <if test="ele.specification != null"> specification = #{ele.specification}, </if>
        <if test="ele.color != null"> color = #{ele.color}, </if>
        <if test="ele.color_code != null"> color_code = #{ele.color_code}, </if>
        <if test="ele.color_block != null"> color_block = #{ele.color_block}, </if>
        <if test="ele.amount != null"> amount = #{ele.amount}, </if>
        <if test="ele.kilo != null"> kilo = #{ele.kilo}, </if>
        <if test="ele.price != null"> price = #{ele.price}, </if>
        <if test="ele.money != null"> money = #{ele.money}, </if>
        <if test="ele.delivery_date != null"> delivery_date = #{ele.delivery_date}, </if>
        <if test="ele.remark != null"> remark = #{ele.remark}, </if>
        <if test="ele.audit != null"> audit = #{ele.audit}, </if>
        <if test="ele.state != null"> state = #{ele.state}, </if>
        <if test="ele.finished != null"> finished = #{ele.finished}, </if>
        <if test="ele.operator != null"> operator = #{ele.operator}, </if>
      </trim>
    </foreach>
  </insert>
大于小于特殊符号使用
| 小于号 | < | < |
|---|---|---|
| 大于号 | > | > |
| 逻辑和 | & | & |
| 单引号 | ' | ' |
| 双引号 | " | " |
| 小于等于 | <= | <= |
| 大于等于 | >= | >= |
或者另外一种方式
<select id="isDeliveryPlanFinished" resultType="java.lang.Boolean">
  <![CDATA[
    SELECT ifnull(sum(b.amount), 0) >= ifnull(a.amount, 0) isFinished
    FROM delivery_plan_dtl a
    LEFT JOIN (SELECT sum(c.amount) amount, b.delivery_plan_dtl_id
    FROM delivery_bill a
    LEFT JOIN delivery_bill_dtl b ON a.id = b.parent_id
    LEFT JOIN (SELECT sum(b.amount) amount, b.delivery_bill_dtl_id
    FROM product_order_bill a
    LEFT JOIN product_order_bill_dtl b ON a.id = b.parent_id
    WHERE a.state = 1
    GROUP BY b.delivery_bill_dtl_id) c ON c.delivery_bill_dtl_id = b.id
    WHERE b.delivery_plan_dtl_id = #{id,jdbcType=BIGINT}
    ) b
    ON b.delivery_plan_dtl_id = a.id
    WHERE a.id = #{id,jdbcType=BIGINT}
    GROUP BY a.id
  ]]>
</select>
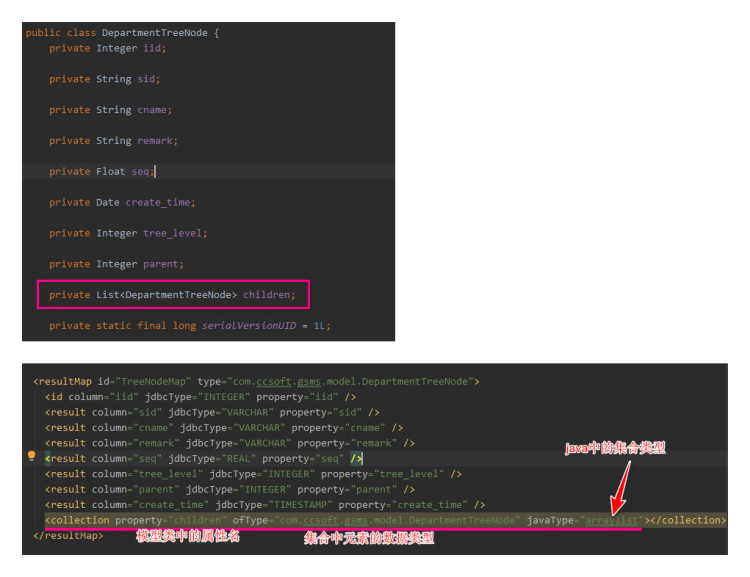
模型类中集合属性
树形基础数据的模型类中要用到集合类型的属性,在 mybatis 中的声明方式看下图
通用 mapper
概述
Mybatis的通用Mapper是国内人做的插件,包含很多基本的CRUD方法,可以很大程度减少工作量,DB中新创建数据表后不用再生成 mapper.xml 然后在其中添加自定义的方法了。在 github 的文档地址是:https://github.com/abel533/Mapper/wiki 。支持3种集成方式:java编码、spring、spring-boot。官方网站:https://mybatis.io/ 在 github 的源码地址是: https://github.com/abel533/Mapper 要求 mybatis 3.2.4 以上。
集成到 spring-boot
依赖
注意翻墙
<dependency>
  <groupId>tk.mybatis</groupId>
  <artifactId>mapper-spring-boot-starter</artifactId>
  <version>2.1.5</version>
</dependency>
同时要提高版本号的依赖,在使用通用 Mapper 之前版本号是 2.1.3
<dependency>
	<groupId>org.mybatis.spring.boot</groupId>
	<artifactId>mybatis-spring-boot-starter</artifactId>
	<version>3.5.0</version>
</dependency>
必要的注解
在启动类的头上使用注解 @MapperScan("com.xdf.flux_trans.dao.general"),之后的实体类的DAO类都放在该包下面。示例代码如下:
package com.xdf.flux_trans.dao.general;

import com.xdf.flux_trans.model.Alarm;
import org.apache.ibatis.annotations.Select;
import tk.mybatis.mapper.common.Mapper;// 这里要使用通用mapper包
import java.util.List;

public interface AlarmMapper extends Mapper<Alarm> {
    // 自定义方法
    @Select("select * from alarm where mill = #{mill}")
    List<Alarm> selectByMill(String mill);
}
如果没有自定义方法,接口内可以不用写任何代码,都继承自父类的方法,有N多,看官方介绍。注意这里不要再使用 @Repository 注解给本类,之后服务中只要通过 @Autowired 注入该DAO即可。
自定义方法
类似上一步中的 selectByMill ,通过注解制作自定义的查询方法即可
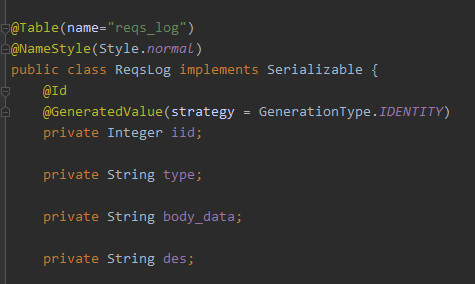
字段名称和自增主键
模型类头上使用 Table 注解表示指定DB中的表名,NameStyle 中的 normal 表示使用DB字段的原始值作为类的属性,不会去下划线变大写等操作。id 注解表示该属性是主键 GeneratedValue 表示是自增,新增后会填充该属性为自增后的值。
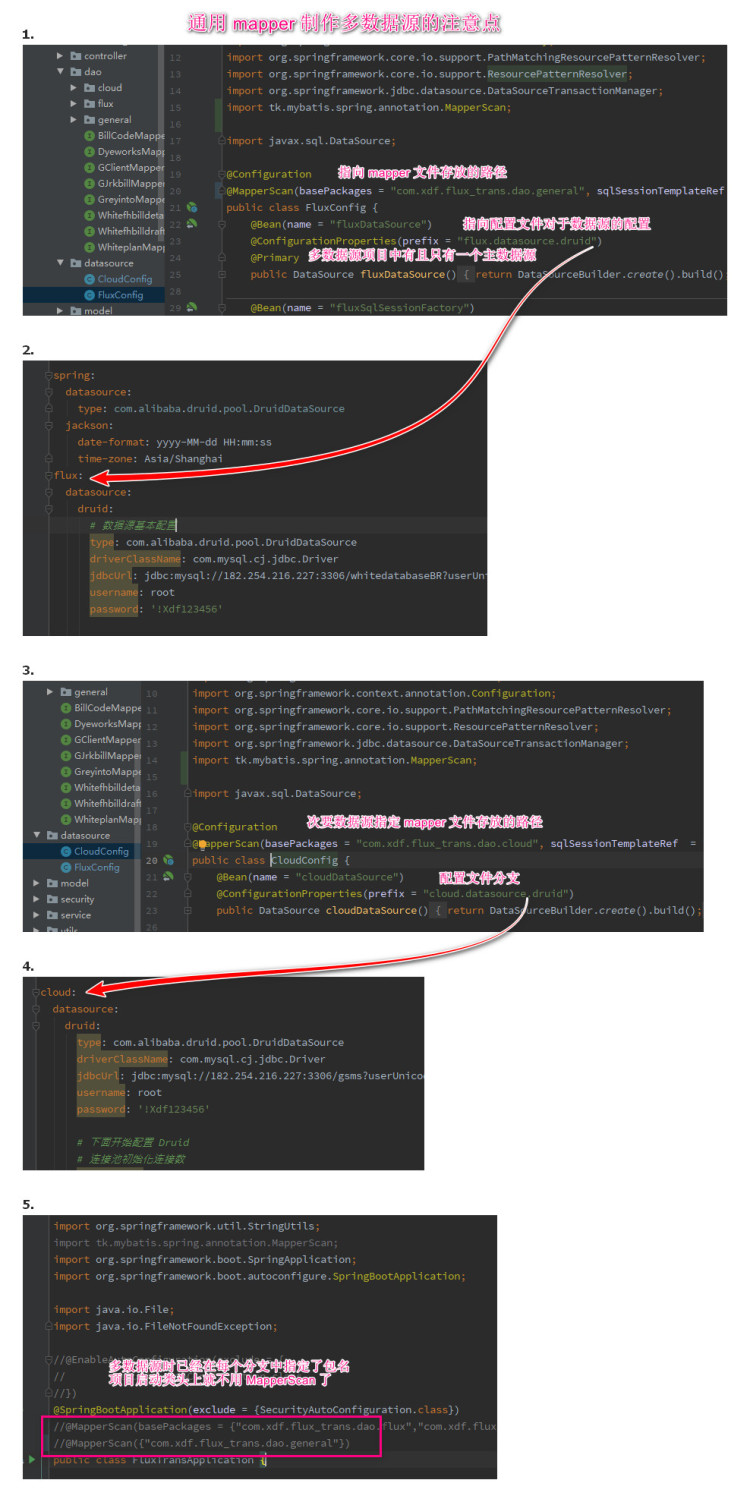
集成多数据源
单数据源时在 springboot 项目的启动类头上添加扫描包路径 @MapperScan("com.xdf.flux_trans.dao.general") 。(注意这里的 Mapper 是 tk 包下的不是 mybatis 的 )集成多数据源后就不能这样设置了,在集成多数据源的项目中将多数据源的配置放在包 datasource 下,一个配置类对应一个数据源,配置中使用 tk 包下的MapperScan
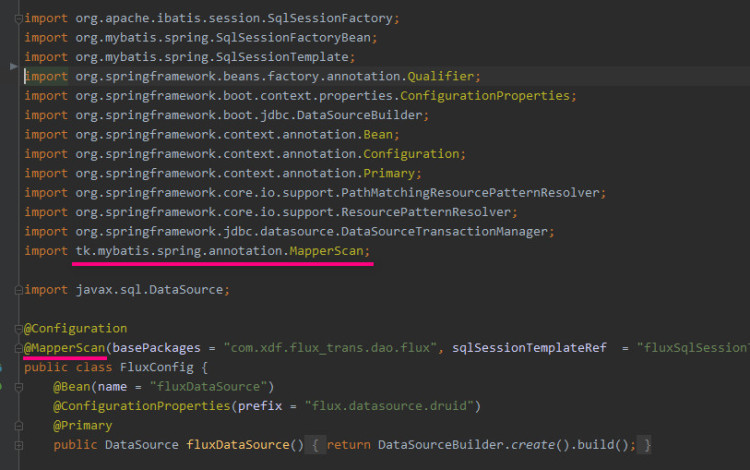
如上图,将原始测试成功的非通用 Mapper 项目下的多数据源配置类中的 MapperScan 注解更换为使用 tk 包下的即可,其他都不用修改,即完成多数据与和通用 Mapper 的集成
配置多数据源 - 2021年2月23日 23:12:36
分页
概述
在 xml 文件中写分页语句要注意分情况使用 ${} 和 #{}。 MYSQL中通过 ... limit 4 offset 5 实现分页,在MYSQL的IDE中不可使用变量替换这两处地方,那么在 mybatis 的 xml 文件中就不能使用 #{} - 占位符的方式,应该采用 ${} - 字符串替换的方式
案例
<select id="selectByParamLike" parameterType="com.ccsoft.atools.model.Vue3userPageParam" resultMap="BaseResultMap">
select
<include refid="Base_Column_List"/>
from vue3user
<where>
<if test="name != null">
and `name` like concat('%',#{name,jdbcType=VARCHAR},'%')
</if>
<if test="realname != null">
and `realname` like concat('%',#{realname,jdbcType=VARCHAR},'%')
</if>
<if test="cellphone != null">
and `cellphone` like concat('%',#{cellphone,jdbcType=VARCHAR},'%')
</if>
<if test="enable != null">
and enable = #{enable,jdbcType=INTEGER}
</if>
<if test="sdate != null">
and createAt >= #{sdate,jdbcType=TIMESTAMP}
</if>
<if test="edate != null">
and createAt <= #{edate,jdbcType=TIMESTAMP}
</if>
</where>
limit ${count} offset ${offset}
</select>
传递多个参数的4中方式
概述
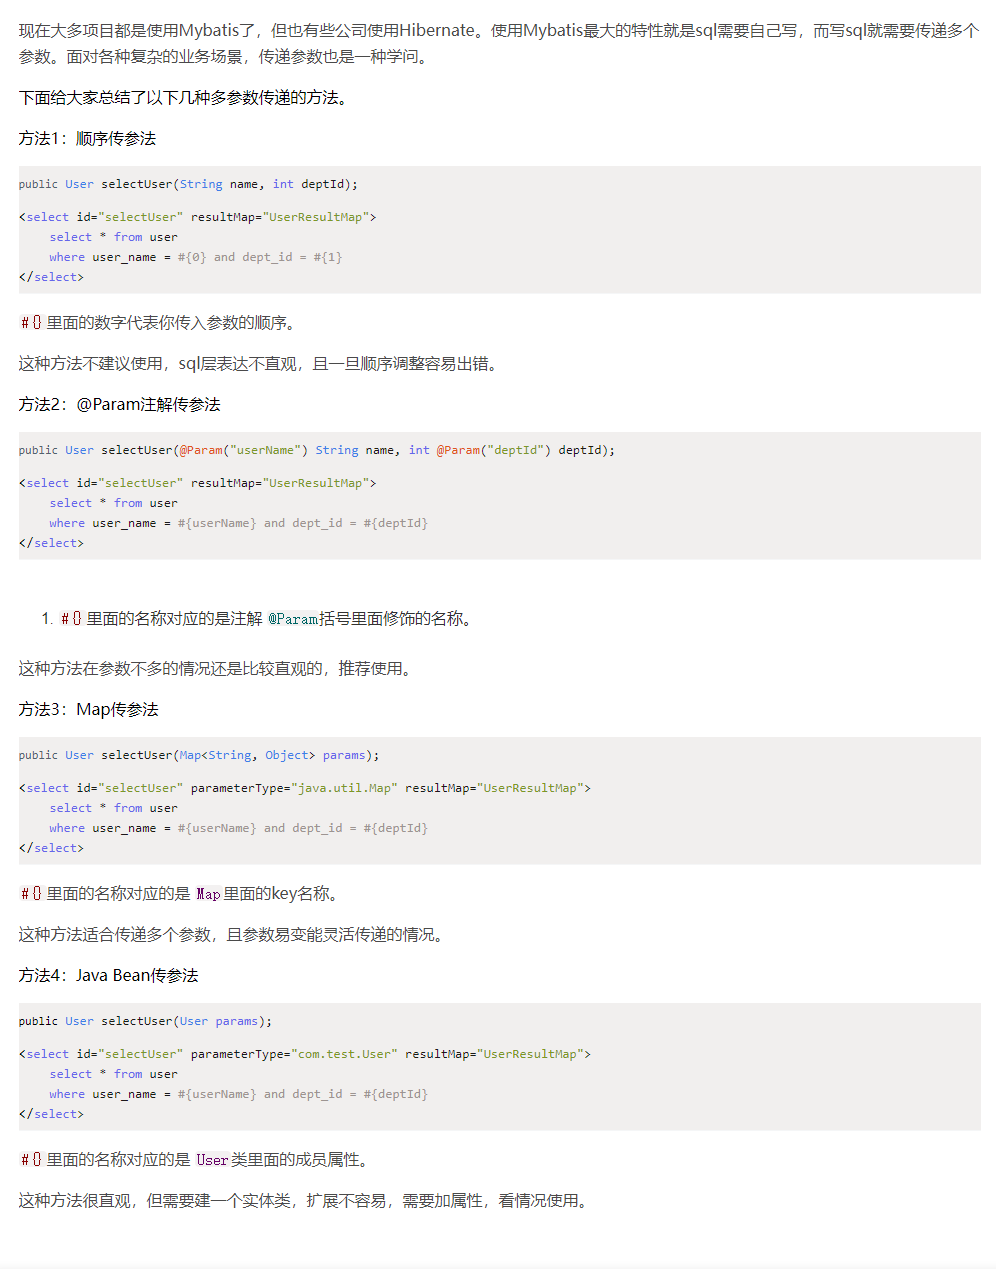
Map传参的方法
通过 map 传参可以传递 List 、数组、对象等等。例如下面代码,构成 Map 类型参数对象的数据是: {"pks":[1,2,4],"record":{"module":"测试","result":1,"remark":"测试备注","user":"开发人员"}} 即 key = pks 是数组,record 是对象
  <insert id="multiInsert" parameterType="java.util.Map">
    insert into log_salesorderdtlfinished (`module`,pk,result,remark,`user`)
    values
    <foreach collection="pks" separator="," item="i" >
      (
        #{record.module,jdbcType=VARCHAR},
        #{i,jdbcType=BIGINT},
        #{record.result,jdbcType=INTEGER},
        #{record.remark,jdbcType=VARCHAR},
        #{record.user,jdbcType=VARCHAR}
      )
    </foreach>
  </insert>
SQLProvider制作通用服务层
概述
mybatis 提供注解 @DeleteProvider 、@UpdateProvider 等可自定义 sql 生成工具,从而制作通过服务层
实现
原理
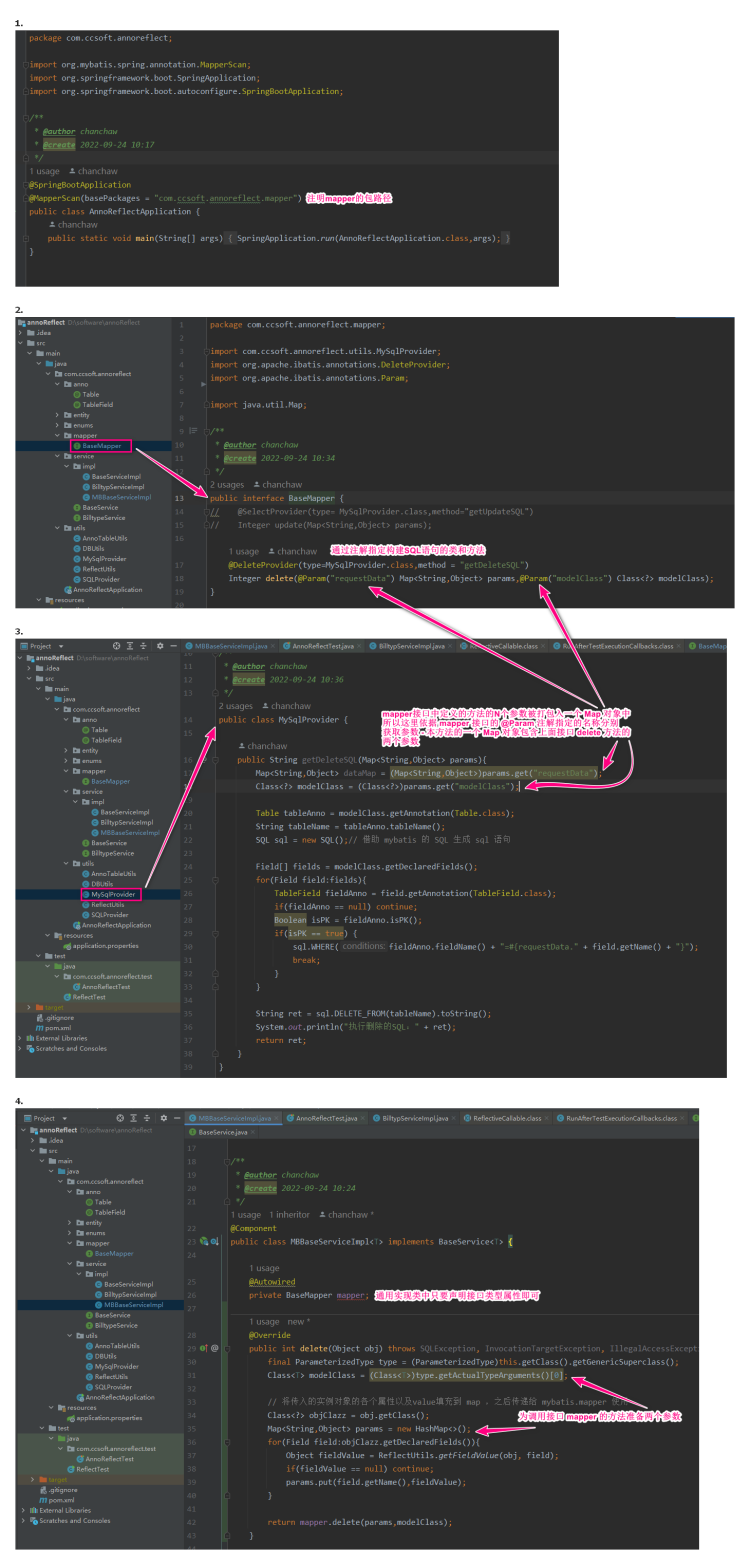
案例
仓库 https://gitee.com/chanchaw/my-orm 视频教程在 180 的阿里云盘 “教程与资料”下的“借助mybatis制作通用ORM”
指令的使用案例
foreach
    <select id="selectExistsInst8PlanIds" resultType="hashmap" parameterType="java.util.List">
        select b.id,b.product_coded,b.amount as amount_plan,
        sum(a.amount) as amount_inst
        from delivery_bill_dtl a
        left join delivery_plan_dtl b on a.delivery_plan_dtl_id = b.id
        where a.delivery_plan_dtl_id in
        <foreach collection="list" item="i" open="(" close=")" separator=",">
            #{i,jdbcType=BIGINT}
        </foreach>
        GROUP BY b.id,b.product_coded,b.amount
        ;
    </select>