nexus
概述
点击进入 历史版本
安装部署
视频教程安装的版本号是 3.58.1 ,自己安装时使用的版本号是 3.67.1,按照详情中步骤安装部署
详情
在 ubuntu22server 上安装部署 java1.8 环境,点击查看 一键部署
安装 nexus,上传文件 nexus-3.67.1-01-java8-unix.tar.gz 到路径 /home/chanchaw 下,执行命令 tar -xzvf nexus-3.67.1-01-java8-unix.tar.gz 解压后得到两个目录 nexus-3.67.1-01 和 sonatype-work,前者是运行程序,后者是仓库位置即保存 jar 的目录
系统配置文件 /home/chanchaw/nexus-3.67.1-01/bin/nexus.vmoptions 中保存了 nexus 运行时的一些配置信息,如内存使用,日志存储文件位置,数据目录等。其中就有参数 -Dkaraf.data=../sonatype-work/nexus3 配置了数据存储的目录。
系统配置文件 /home/chanchaw/nexus-3.67.1-01/etc/nexus-default.properties 配置了系统启动时监听的 ip 地址和端口号,初次安装修改默认端口号为 11808
配置后切换路径到 /home/chanchaw/nexus-3.67.1-01/bin 下执行 ./nexus start 启动服务,命令 ./nexus status 检查当前状态
systemctl管理服务
使用下面命令创建 systemctl 管理的后台服务,其中 chanchaw 是当前登录账号
# 创建文件
sudo vim /etc/systemd/system/nexus.service

# 黏贴下面代码后保存
[Unit]
Description=Nexus Repository Manager
After=network.target

[Service]
Type=forking
LimitNOFILE=65536
User=chanchaw
Group=chanchaw  # 使用用户的主组
ExecStart=/home/chanchaw/nexus-3.67.1-01/bin/nexus start
ExecStop=/home/chanchaw/nexus-3.67.1-01/bin/nexus stop
Restart=on-abort
WorkingDirectory=/home/chanchaw/nexus-3.67.1-01/
RestartSec=10

[Install]
WantedBy=multi-user.target

# 赋予可执行权限
sudo chmod +x /etc/systemd/system/nexus.service
# 重新加载 systemd 配置
sudo systemctl daemon-reload
# 启用 Nexus 服务开机自启
sudo systemctl enable nexus
# 启动 Nexus 服务
sudo systemctl start nexus
# 检查服务状态
sudo systemctl status nexus
配置服务端
访问登录
安装成功后浏览器访问地址 http://192.168.0.179:11808/,进入后点击右上角的 Sign in 进行登录。会提示管理员账号是 admin 初始密码在 /home/chanchaw/sonatype-work/nexus3/admin.password 下是 5fbd7699-cc64-4826-8533-f182adc9754b ,登录后要求初始化,选择禁用匿名访问模式。
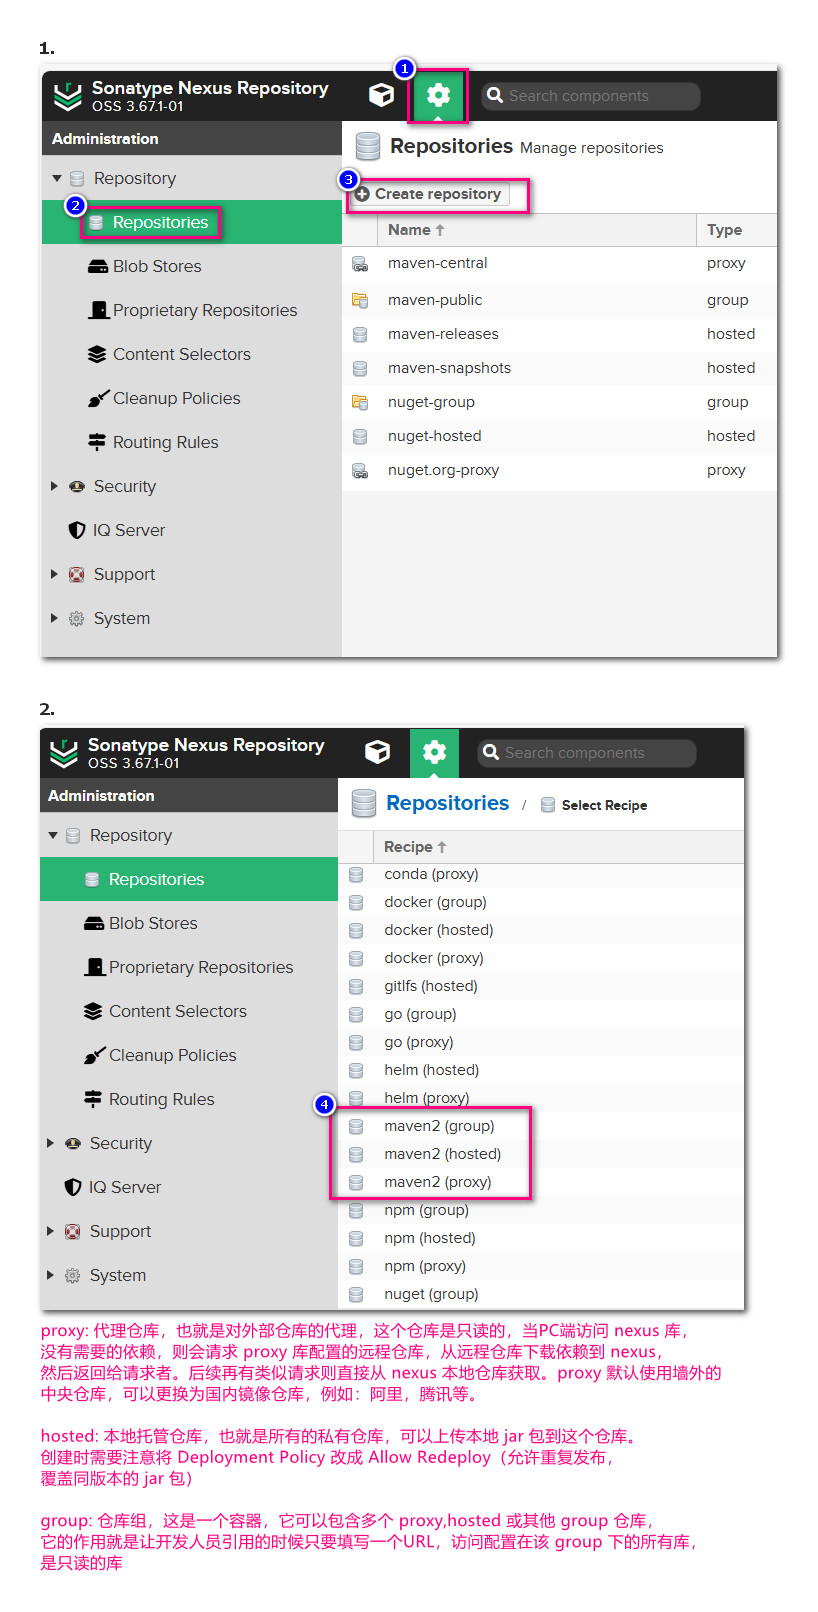
nexus仓库分类
按照下面步骤创建 maven 仓库,分为三种类型
- proxy 代理仓库,也就是对外部仓库的代理,这个仓库是只读的,当PC端访问 nexus 库, 没有需要的依赖,则会请求 proxy 库配置的远程仓库,从远程仓库下载依赖到 nexus, 然后返回给请求者。后续再有类似请求则直接从 nexus 本地仓库获取。proxy 默认使用墙外的 中央仓库,可以更换为国内镜像仓库,例如:阿里,腾讯等。
- hosted 本地托管仓库,也就是所有的私有仓库,可以上传本地 jar 包到这个仓库。 创建时需要注意将 Deployment Policy 改成 Allow Redeploy(允许重复发布, 覆盖同版本的 jar 包)
- group 仓库组,这是一个容器,它可以包含多个 proxy,hosted 或其他 group 仓库, 它的作用就是让开发人员引用的时候只要填写一个URL,访问配置在该 group 下的所有库, 是只读的库
创建仓库
按照下面步骤创建一个 hosted 仓库

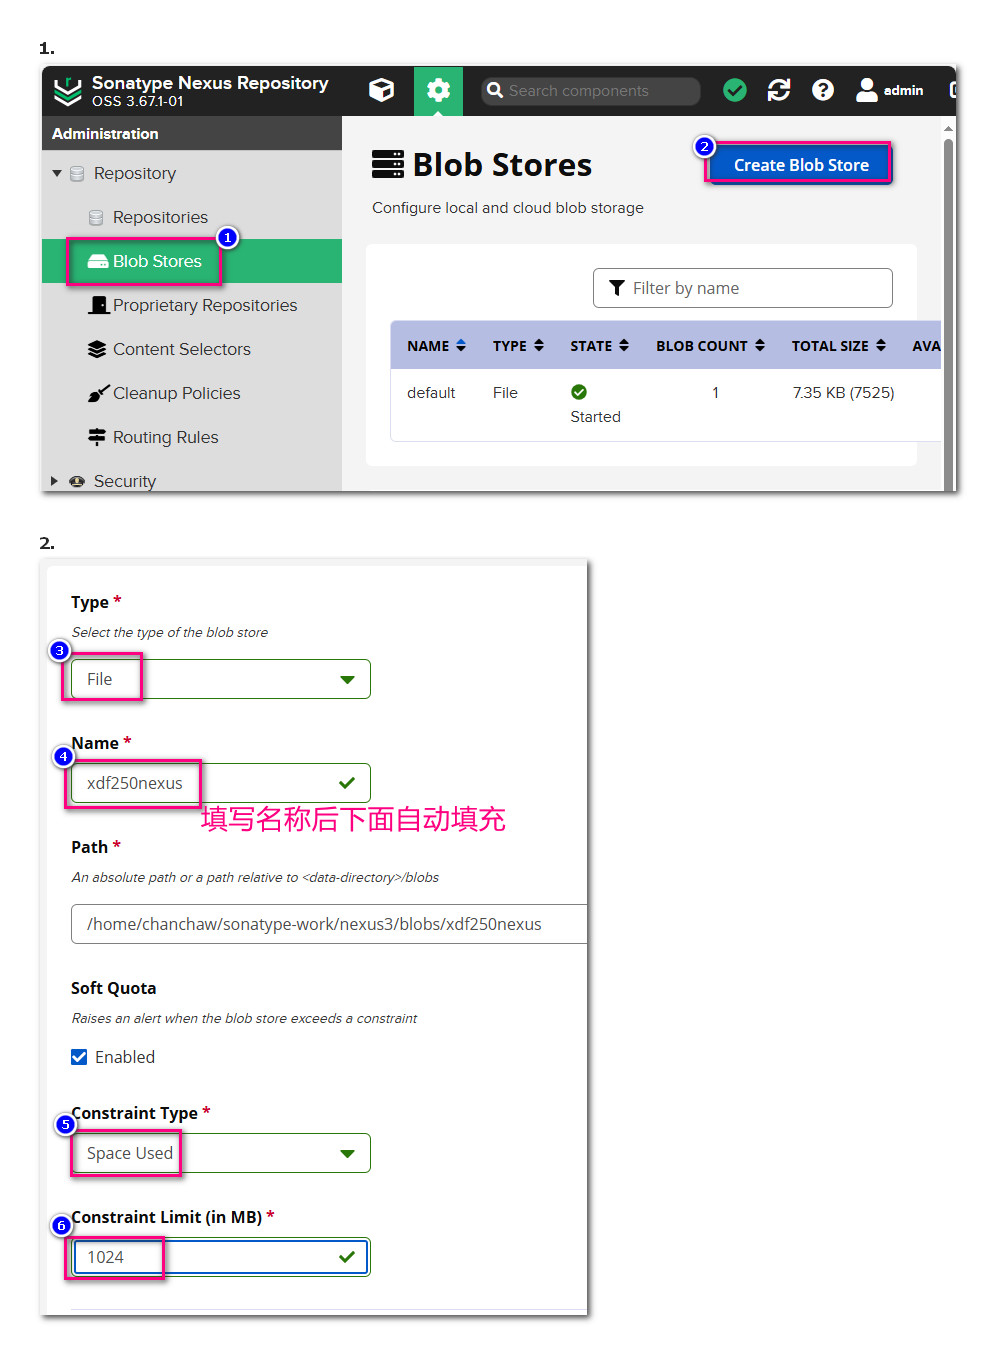
如果想要使用自己创建的路径保存下载的 jar 则到 Blob Stores 中创建 store
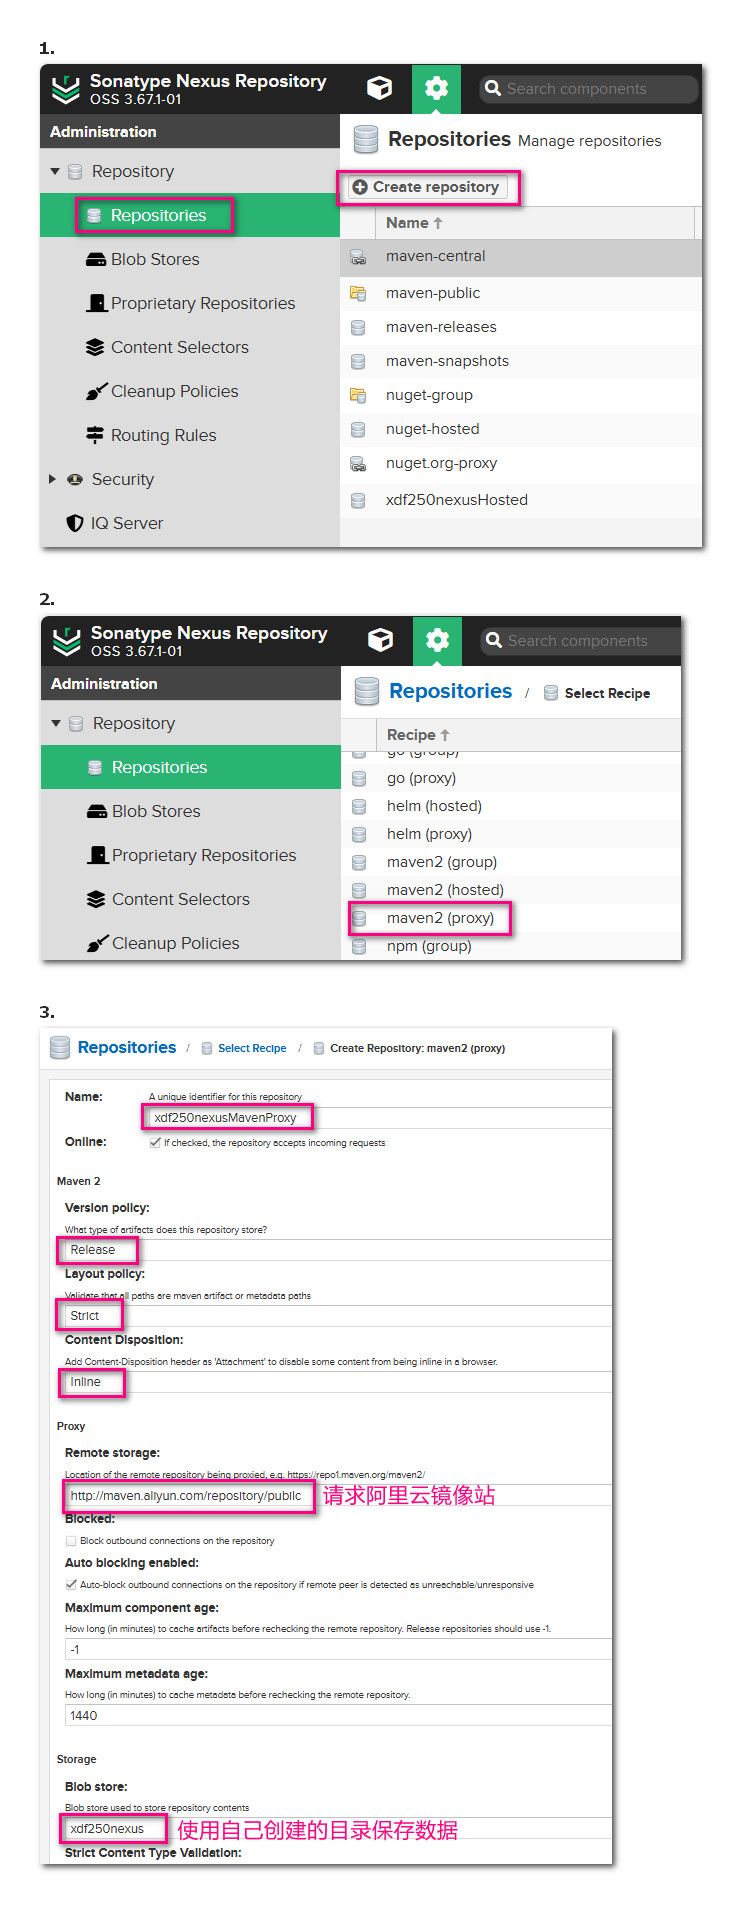
创建代理仓库,请求阿里云镜像站
详情
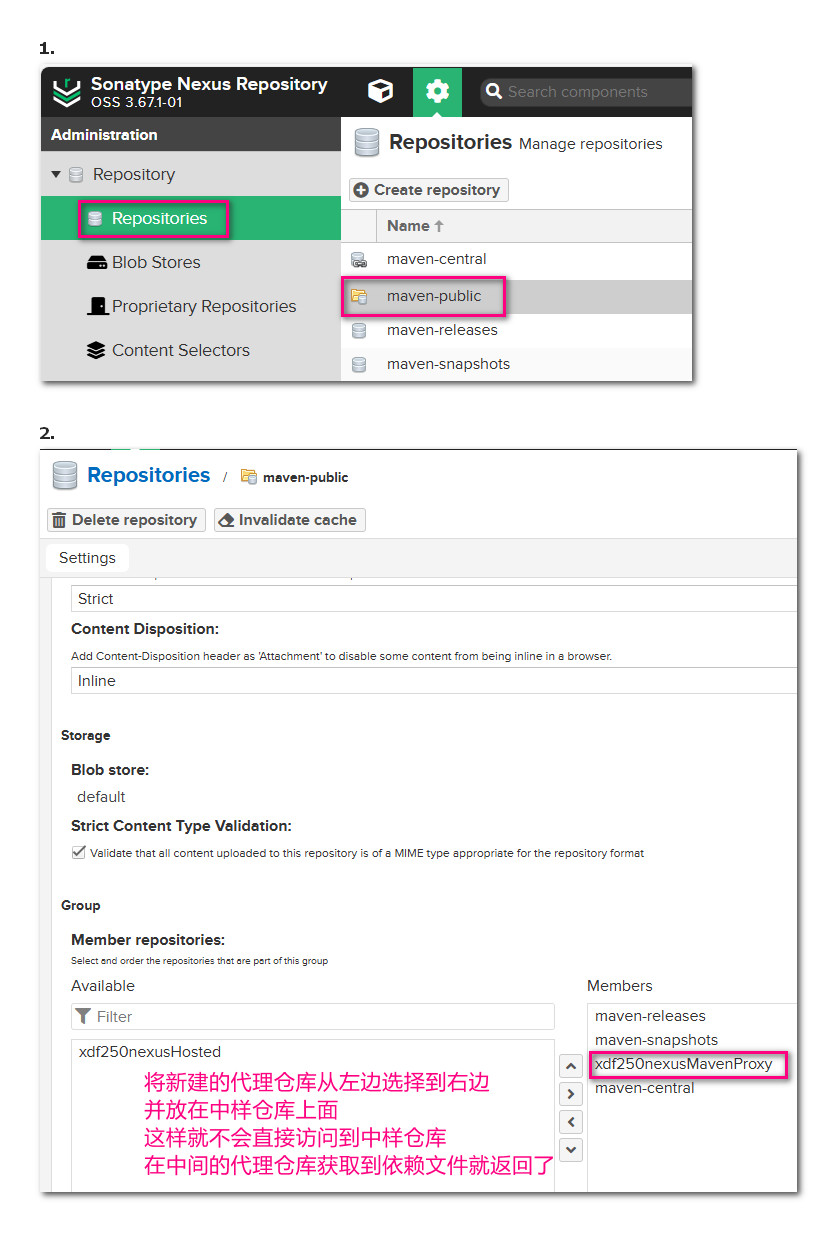
上面新增的代理仓库要添加到 maven-public 中,以后项目中连接到该仓库
详情
项目应用
一、在maven配置文件settings.xml中设置nexus服务器地址
在 maven 配置文件 settings.xml 中注册 nexus 服务器并设置镜像站点地址,在 IDEA 按照路径 File > Settings... > Build,Execution,Deployment > Build Tools > Maven 右边找到项目 User settings file 设置了 maven 使用的配置文件,打开文件后设置如下
<!-- 在节点 servers 下新增下面节点,指向自己创建的 nexus 服务器,切记之后设置镜像时都要使用下面设置的 id -->
<server>
    <id>xdf250nexusMaven</id>
    <username>admin</username>
    <password>7758chanchaw</password>
</server>
<!-- 在节点 mirrors 中添加下面节点 -->
<mirror>
    <id>xdf250nexusMaven</id>
    <name>xdf250nexusMaven</name>
    <url>http://192.168.0.179:11808/repository/maven-public/</url>
    <mirrorOf>central</mirrorOf>
</mirror>
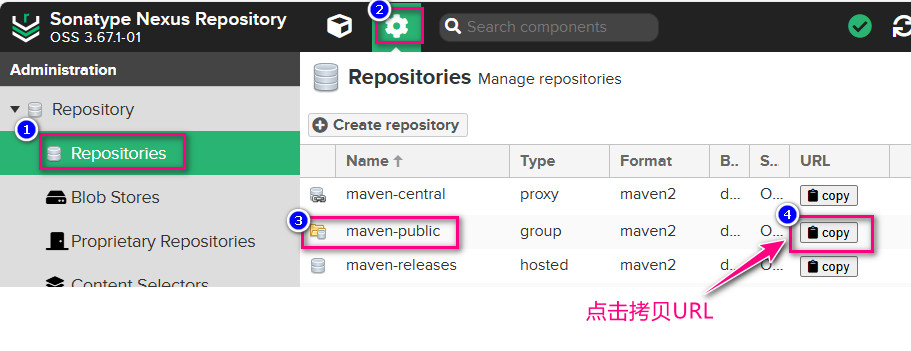
上面配置的 maven-public 即 nexus 服务器中如下图的仓库,修改之前备份了原文件为 \\192.168.0.250\alist\安装程序\cc\docs\conf\IDEA\settings.xml
二、上传自定义jar到nexus
如果有自己制作的工具 jar 需要上传到 maven 仓库,在项目的 pom.xml 做如下配置,主要看节点 distributionManagement,注意其中的 id 要和 maven 的配置文件 settings.xml 中指定的 id 一致,下面配置 releases 和 snapshots 节点的 URL 记得从 nexus 服务器上拷贝来。
<?xml version="1.0" encoding="UTF-8"?>
<project xmlns="http://maven.apache.org/POM/4.0.0"
         xmlns:xsi="http://www.w3.org/2001/XMLSchema-instance"
         xsi:schemaLocation="http://maven.apache.org/POM/4.0.0 http://maven.apache.org/xsd/maven-4.0.0.xsd">
    <modelVersion>4.0.0</modelVersion>

    <groupId>com.cc</groupId>
    <artifactId>alltype</artifactId>
    <version>1.0-SNAPSHOT</version>

    <properties>
        <maven.compiler.source>8</maven.compiler.source>
        <maven.compiler.target>8</maven.compiler.target>
        <project.build.sourceEncoding>UTF-8</project.build.sourceEncoding>
    </properties>

    <distributionManagement>
        <repository>
            <id>xdf250nexusMaven</id>
            <url>http://192.168.0.179:11808/repository/maven-releases/</url>
        </repository>
        <snapshotRepository>
            <id>xdf250nexusMaven</id>
            <url>http://192.168.0.179:11808/repository/maven-snapshots/</url>
        </snapshotRepository>
    </distributionManagement>
</project>
配置后首次运行 maven > Lifecycle > clean 时速度很慢,会先下载依赖文件,在工具类的工程中运行 maven > Lifecycle > deploy 然后到 nexus 服务器可以查看到
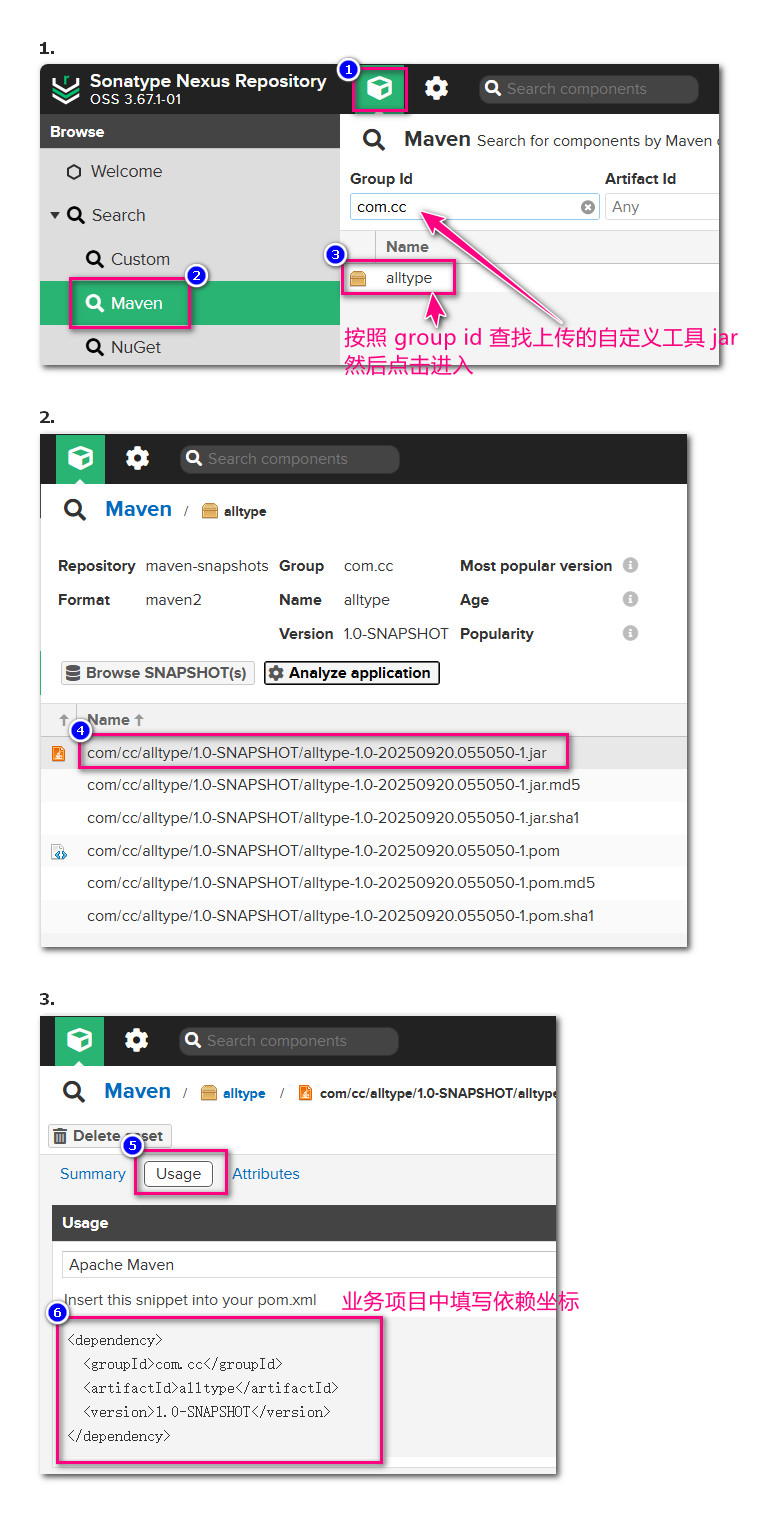
三、查看依赖坐标
四、业务项目引用坐标
业务项目中首先在 pom.xml 中设置 nexus 服务器,下面节点在 pom.xml 中 project 节点下的一级节点
<repositories>
    <repository>
        <id>xdf250nexusMaven</id>
        <name>xdf250nexusMaven</name>
        <url>http://192.168.0.179:11808/repository/maven-public/</url>
        <releases>
            <enabled>true</enabled>
        </releases>
        <snapshots>
            <enabled>true</enabled>
        </snapshots>
    </repository>
</repositories>
然后添加自定义的依赖坐标,2025年9月20日 测试成功。
<dependency>
    <groupId>com.cc</groupId>
    <artifactId>alltype</artifactId>
    <version>1.0-SNAPSHOT</version>
</dependency>
上传本地依赖
上传本地依赖到 nexus 服务器(本地项目已经下载了N多依赖),将下面代码保存为 upload-to-nexus.bat 右键管理员运行,上传本地依赖到 nexus 服务器。注意先修改下面代码中的服务器IP端口号以及登录 nexus 管理系统的账号密码
@echo off
setlocal enabledelayedexpansion

REM 设置参数
set NEXUS_URL=http://192.168.0.179:11808/repository/maven-releases/
set USERNAME=admin
set PASSWORD=7758chanchaw
set LOCAL_REPO=D:\softWare\Maven3.8.1\apache-maven-localRepository

echo 开始上传构件至Nexus...

REM 进入本地仓库目录
cd /d "%LOCAL_REPO%"

REM 遍历所有文件
for /r . %%f in (*.jar *.pom *.war *.ear *.rar *.aar *.zip) do (
    set "filepath=%%f"
    REM 创建相对路径(将反斜杠替换为斜杠)
    set "relativepath=!filepath:%LOCAL_REPO%\=!"
    set "relativepath=!relativepath:\=/!"

    echo 上传: !relativepath!

    REM 使用curl上传
    curl -u %USERNAME%:%PASSWORD% -X PUT -T "%%f" "%NEXUS_URL%!relativepath!"
)

echo 上传完成!
pause