starter
概述
介绍 spring boot starter
规范
命名规范
spring官方的starter一般spring-boot-starter-xxx,例如spring-boot-start-web- 第三方开发的一般
xxx-spring-boot-starter,例如mybatis-spring-boot-starter
starter案例
自动装配
介绍 mybatis 的 starter 如何制作以及实现的。自己制作的 starter 需要在类头上使用注解 @Configuration 以及 @Bean,使自己的类可以被当做配置类,同时由 spring 自动创建 bean 并纳入 IOC 容器管理。在使用了 mybatis 的项目中找到如下依赖,是其进行初始化的配置类
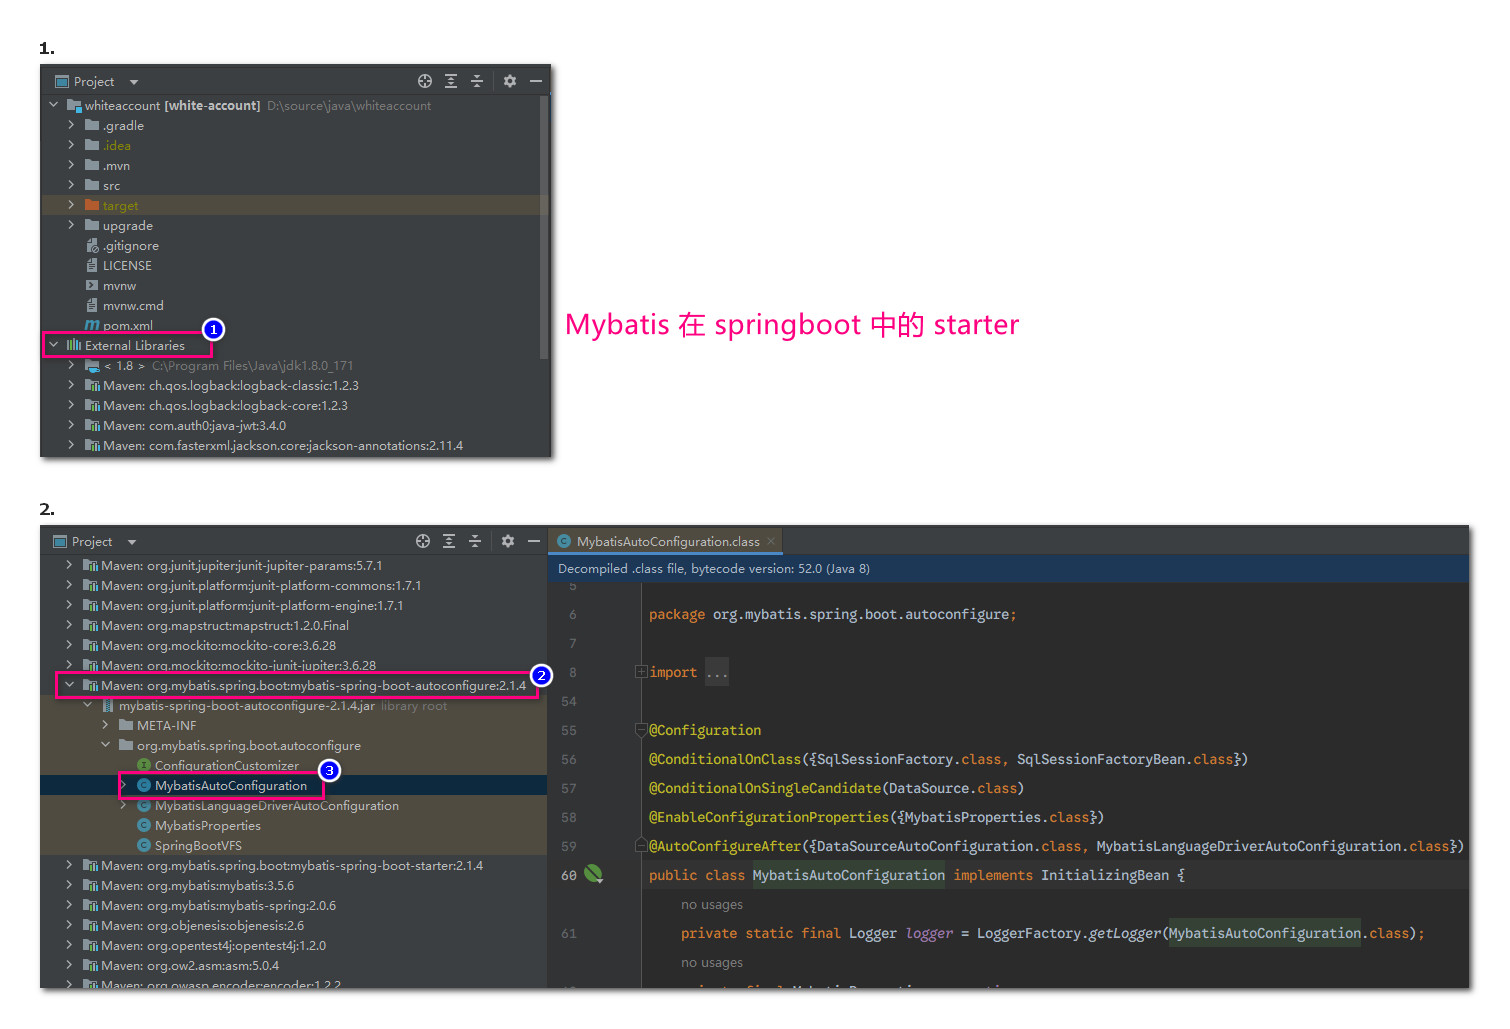
类头上的两个注解 @ConditionalOnClass,@ConditionalOnSingleCandidate,是条件依赖,只有当这两个类或者 bean 存在才会实例化本类对应的 bean。注解 @ConditionalOnMissingBean 只有当本名称的 bean 不存在才会创建,防止重复创建。
Bean参数获取
就是自动装配时需要用到的参数是如何获取到的。定义使用了注解 @ConfigurationProperties 的配置类,用于匹配 yml 中的配置项,在创建 bean 的过程中就可以用到用户设置的参数了。注意本注解要配合 @EnableConfigurationProperties 使用
Bean的发现
springboot 项目启动后默认扫描启动类所在包下的所有类,包括该包下的所有子包中的类,但是不会扫描本项目依赖中的包路径。springboot 项目会扫描依赖包的路径 META-INF\spring.factories,当其中有如下代码,则表示要自动加载两个类 MybatisLanguageDriverAutoConfiguration,MybatisAutoConfiguration
# Auto Configure
org.springframework.boot.autoconfigure.EnableAutoConfiguration=\
org.mybatis.spring.boot.autoconfigure.MybatisLanguageDriverAutoConfiguration,\
org.mybatis.spring.boot.autoconfigure.MybatisAutoConfiguration
案例
最简案例
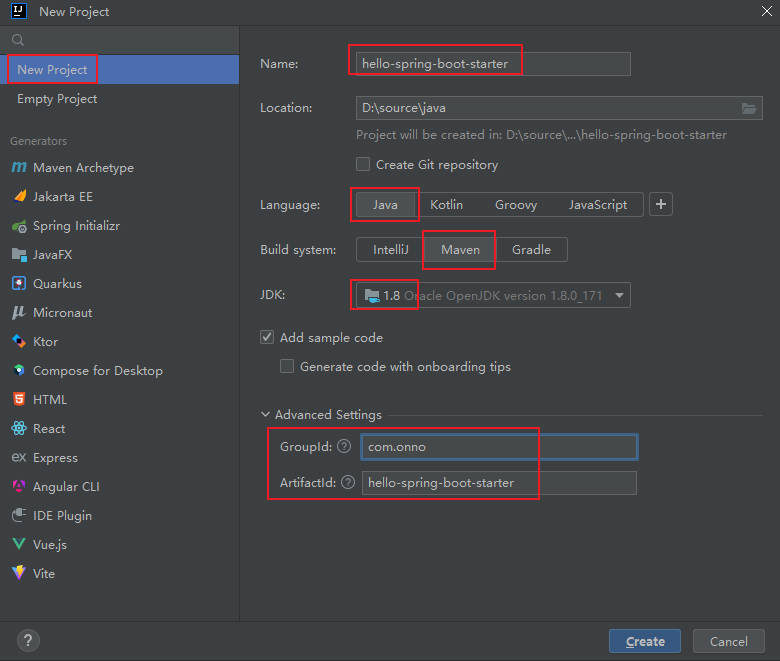
制作starter项目
如下创建一个新项目
创建配置类,用于读取配置文件中的参数
package com.onno.config;

import org.springframework.boot.context.properties.ConfigurationProperties;

/**
 * 配置类
 * @author chanchaw
 * @create 2026-05-20 14:57
 */
@ConfigurationProperties(prefix = "onno.demo.hello")
public class HelloProperties {
    private String name;
    private String addr;

    public String getName() {
        return name;
    }

    public void setName(String name) {
        this.name = name;
    }

    public String getAddr() {
        return addr;
    }

    public void setAddr(String addr) {
        this.addr = addr;
    }

    @Override
    public String toString() {
        return "HelloProperties{" +
                "name='" + name + '\'' +
                ", addr='" + addr + '\'' +
                '}';
    }
}
创建一个实现业务逻辑的类
package com.onno.service;

/**
 * @author chanchaw
 * @create 2026-05-20 15:11
 */
public class HelloService {
    private String name;
    private String addr;

    public HelloService(String name, String addr) {
        this.name = name;
        this.addr = addr;
    }

    public String sayHello(){
        return "你好,我是" + this.name + ",我来自" + this.addr;
    }
}
创建自动配置类,读取配置后创建类对象,交给 IOC 管理
package com.onno.config;

import com.onno.service.HelloService;
import org.springframework.boot.autoconfigure.condition.ConditionalOnMissingBean;
import org.springframework.boot.context.properties.EnableConfigurationProperties;
import org.springframework.context.annotation.Bean;
import org.springframework.context.annotation.Configuration;

/**
 * 自动配置类
 * @author chanchaw
 * @create 2026-05-20 15:13
 */
@EnableConfigurationProperties(value = HelloProperties.class)
@Configuration
public class HelloServiceAutoConfiguration {
    private HelloProperties helloProperties;

    public HelloServiceAutoConfiguration(HelloProperties helloProperties) {
        this.helloProperties = helloProperties;
    }

    @ConditionalOnMissingBean
    @Bean
    public HelloService helloService(){
        return new HelloService(helloProperties.getName(),helloProperties.getAddr());
    }
}
创建配置文件,最关键,springboot 项目靠读取本文件装配自定义的 starter
# 在项目目录 resources 下创建文件META-INF/spring.factories
# 下面是全部代码
org.springframework.boot.autoconfigure.EnableAutoConfiguration=com.onno.config.HelloServiceAutoConfiguration
最后在 maven 中执行 install ,安装到本地仓库中,会在 IDEA 的控制台中看到如下提示
[INFO] --- install:2.5.2:install (default-install) @ hello-spring-boot-starter ---
[INFO] Installing D:\source\java\hello-spring-boot-starter\target\hello-spring-boot-starter-1.0-SNAPSHOT.jar to D:\software\Maven3.8.1\apache-maven-localRepository\com\onno\hello-spring-boot-starter\1.0-SNAPSHOT\hello-spring-boot-starter-1.0-SNAPSHOT.jar
[INFO] Installing D:\source\java\hello-spring-boot-starter\pom.xml to D:\software\Maven3.8.1\apache-maven-localRepository\com\onno\hello-spring-boot-starter\1.0-SNAPSHOT\hello-spring-boot-starter-1.0-SNAPSHOT.pom
[INFO] ------------------------------------------------------------------------
[INFO] BUILD SUCCESS
表示将编译后的 jar 工具包安装到了目录 D:\software\Maven3.8.1\apache-maven-localRepository 下,接下来就是创建应用工程,使用本 starter 项目。
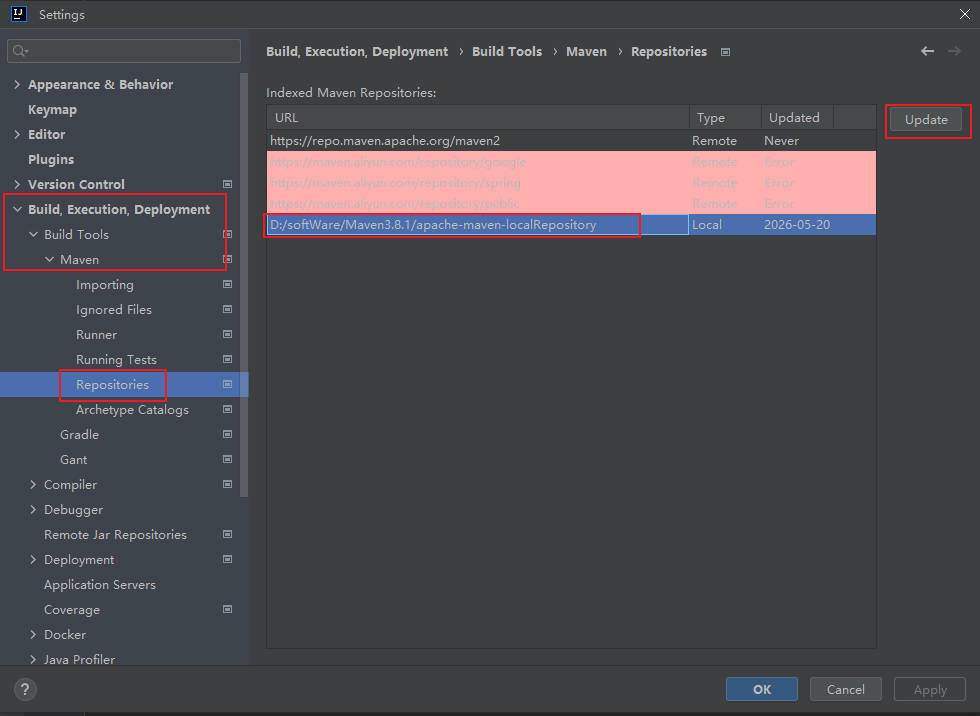
更新 maven 索引
如上操作后,向本地仓库添加了自定义的依赖,如果马上创建测试用项目,可能会由于 maven 没有及时更新索引导致验证失败,要如下更新 maven 索引
使用上面starter
创建一个 springboot 应用并引用上面自定义的 starter,创建一个带有 web 功能的 springboot 项目,在配置文件中添加如下配置项
onno:
  demo:
    hello:
      name: chanchaw
      addr: xxxyyy
在控制器中直接注入上面 starter 项目中的 HelloService 的 bean 即可使用。
拦截器starter
制作starter项目
*1/5 依赖
首先添加如下依赖,特别注意要使用标签 parent,指定 springboot 版本号,下面的依赖才能自动匹配导入对应版本号的依赖
<?xml version="1.0" encoding="UTF-8"?>
<project xmlns="http://maven.apache.org/POM/4.0.0"
         xmlns:xsi="http://www.w3.org/2001/XMLSchema-instance"
         xsi:schemaLocation="http://maven.apache.org/POM/4.0.0 http://maven.apache.org/xsd/maven-4.0.0.xsd">
    <modelVersion>4.0.0</modelVersion>

    <groupId>com.onno</groupId>
    <artifactId>interceptor-spring-boot-starter</artifactId>
    <version>1.0-SNAPSHOT</version>

    <properties>
        <maven.compiler.source>8</maven.compiler.source>
        <maven.compiler.target>8</maven.compiler.target>
        <project.build.sourceEncoding>UTF-8</project.build.sourceEncoding>
    </properties>

    <parent>
        <groupId>org.springframework.boot</groupId>
        <artifactId>spring-boot-starter-parent</artifactId>
        <version>2.2.2.RELEASE</version>
    </parent>
    <dependencies>
        <!-- 制作 starter 项目必备依赖 -->
        <dependency>
            <groupId>org.springframework.boot</groupId>
            <artifactId>spring-boot-starter</artifactId>
        </dependency>
        <dependency>
            <groupId>org.springframework.boot</groupId>
            <artifactId>spring-boot-autoconfigure</artifactId>
        </dependency>
        <!-- web依赖 -->
        <dependency>
            <groupId>org.springframework.boot</groupId>
            <artifactId>spring-boot-starter-web</artifactId>
            <optional>true</optional>
        </dependency>
        <!-- 处理器 -->
        <dependency>
            <groupId>org.springframework.boot</groupId>
            <artifactId>spring-boot-configuration-processor</artifactId>
        </dependency>
    </dependencies>
</project>
2/5 自定义注解
制作自定义注解,才具体的业务模块中使用本注解打印 api 执行过程的耗时时长
package com.onno.interceptor;

import java.lang.annotation.ElementType;
import java.lang.annotation.Retention;
import java.lang.annotation.RetentionPolicy;
import java.lang.annotation.Target;

/**
 * @author chanchaw
 * @create 2026-05-21 13:18
 */
@Target(ElementType.METHOD)
@Retention(RetentionPolicy.RUNTIME)
public @interface ApiElapseLog {
    /**
     * 方法描述
     * @return
     */
    String desc() default "";
}
3/5 自定义拦截器
在请求开始时记录开始时间,请求结束时计算耗时的时长,最后切记要在请求完成的回调中清除 ThreadLocal 变量,否则会有内存泄露
package com.onno.interceptor;

import org.springframework.web.method.HandlerMethod;
import org.springframework.web.servlet.ModelAndView;
import org.springframework.web.servlet.handler.HandlerInterceptorAdapter;
import javax.servlet.http.HttpServletRequest;
import javax.servlet.http.HttpServletResponse;
import java.lang.reflect.Method;

/**
 * @author chanchaw
 * @create 2026-05-21 14:04
 */
public class CcWebInterceptor extends HandlerInterceptorAdapter {
    private static final ThreadLocal<Long> startTime = new ThreadLocal<>();
    @Override
    public boolean preHandle(HttpServletRequest request, HttpServletResponse response, Object handler) throws Exception {
        HandlerMethod handlerMethod = (HandlerMethod)handler;
        Method method = handlerMethod.getMethod();
        ApiElapseLog annotation = method.getAnnotation(ApiElapseLog.class);
        if(annotation == null) return true;

        startTime.set(System.currentTimeMillis());
        return true;
    }

    @Override
    public void postHandle(HttpServletRequest request, HttpServletResponse response, Object handler, ModelAndView modelAndView) throws Exception {
        HandlerMethod handlerMethod = (HandlerMethod)handler;
        Method method = handlerMethod.getMethod();
        ApiElapseLog annotation = method.getAnnotation(ApiElapseLog.class);

        if(annotation != null) {
            Long l = startTime.get();
            long l1 = System.currentTimeMillis();
            long elapse = l1 - l;

            String requestURI = request.getRequestURI();
            String methodName = method.getDeclaringClass().getName() + "." + method.getName();
            String desc = annotation.desc();
            System.out.println("\n=== ApiElapseLog - start ===");
            System.out.println("1/4. uri:" + requestURI);
            System.out.println("2/4. method:" + methodName);
            System.out.println("3/4. desc:" + desc);
            System.out.println("4/4. 执行时长:" + elapse + "ms");
            System.out.println("=== ApiElapseLog - end ===\n");
        }

        super.postHandle(request, response, handler, modelAndView);
    }

    @Override
    public void afterCompletion(HttpServletRequest request, HttpServletResponse response, Object handler, Exception ex) throws Exception {
        /**
         * 请求完成后要清除 ThreadLocal,防止内存泄露,保证每次计时的准确性
         * 不可在 postHandle 中清除,如果请求出现异常会导致无法清除
         * 而本方法内清除,即使请求过程中出现异常,也能成功移除
         * 即使没有使用注解 ApiElapseLog ,方法 remove 也是安全的
         */
        startTime.remove();
        super.afterCompletion(request, response, handler, ex);
    }
}
4/5 自动配置类
制作自动配置类,使业务项目启动后自动加载本 starter
package com.onno.interceptor;

import org.springframework.context.annotation.Configuration;
import org.springframework.web.servlet.config.annotation.InterceptorRegistry;
import org.springframework.web.servlet.config.annotation.WebMvcConfigurer;

/**
 * @author chanchaw
 * @create 2026-05-21 15:35
 */
@Configuration
public class CcWebInterceptorAutoConfiguration implements WebMvcConfigurer {
    public void addInterceptors(InterceptorRegistry registry) {
        registry.addInterceptor(new CcWebInterceptor());
    }
}
5/5 注册自动扫描
制作文件 resources/META-INF/spring.factories ,代码如下。业务 springboot 项目在依赖本 starter 后可以自动扫描加载
org.springframework.boot.autoconfigure.EnableAutoConfiguration=com.onno.interceptor.CcWebInterceptorAutoConfiguration
使用starter
1/2 依赖
添加上面 starter 的依赖
<dependency>
    <groupId>com.onno</groupId>
    <artifactId>interceptor-spring-boot-starter</artifactId>
    <version>1.0-SNAPSHOT</version>
</dependency>
2/2 使用
具体的业务逻辑中使用注解打印接口耗时
@ApiElapseLog()
@GetMapping("/starter")
public String starter(){
    return  helloService.sayHello();
}

// 会在控制台打印日志:
=== ApiElapseLog - start ===
1/4. uri:/hello/starter
2/4. method:com.onno.starterdemo.controller.HelloController.starter
3/4. desc:
4/4. 执行时长:16ms
=== ApiElapseLog - end ===